It's wonderful to take 4K, 1080p videos with iPhone(iPhone 6S, iPhone 6, iPhon 6 Plus) and want to edit these interesting iPhone video with Windows Movie Maker, then share the iPhone video with friends or upload to YouTube or Facebook. Unfortunately, you always fail when you import iPhone video to Windows Movie Maker.
As we know, iPhone (including iPhone 6S, iPhone 6, iPhone 6 Plus, iPhone 5S, iPhone 5C, iPhone 4S, etc.) records in .MOV files compressed using the h.264 codec, which isn't a codec that plays well together with Windows Movie Maker.
To import an iPhone Video into Windows Movie Maker, what you need is just a professional video converter like iFastime Video Converter Ultimate, which can help you transcode iPhone video to WMV so that you can import iPhone video to Windows Movie Maker for editing. Beside iPhone video, it can also convert many video formats like M2TS, AVI, VOB, Xvid, etc. to Windows Movie Maker, and compress 4K video captured by iPhone 6S/6/6 Plus to 1080p or 720p to save more storage. What's more, it can help you convert iPhone video to Sony Vegas, Adobe Premiere Pro, Avid Media Composer and more. Read review to learn more. Just download it and follow the steps below.
Free Download or Purchase iFastime Video Converter Ultimate:

 Other Download:
How to import iPhone Videos to Windows Movie Maker
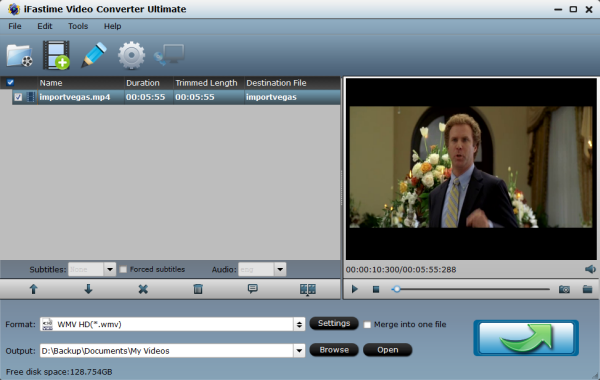
Step 1. Load iPhone recorded files to the program
After install and run the Video Converter, click "Add Video" button to load the iPhone files. And you also can drag the files to this program directly.
Other Download:
How to import iPhone Videos to Windows Movie Maker
Step 1. Load iPhone recorded files to the program
After install and run the Video Converter, click "Add Video" button to load the iPhone files. And you also can drag the files to this program directly.
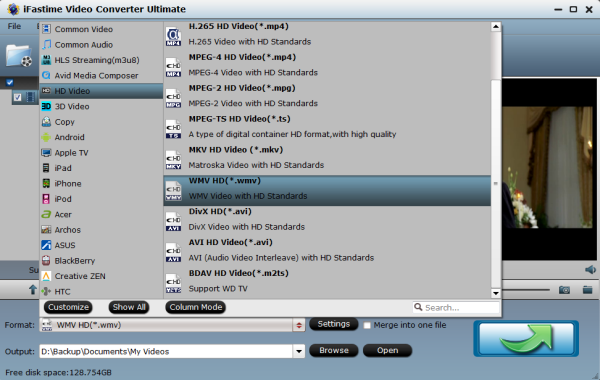
 Step 2. Choose output format
Choose the output format as WMV. To do this, click the "Format" on the bottom of the Software window and choose WMV from "Common Video" category. To get high output video quality, you're recommended to choose "WMV HD(*.wmv)" from "HD Video" category.
Step 2. Choose output format
Choose the output format as WMV. To do this, click the "Format" on the bottom of the Software window and choose WMV from "Common Video" category. To get high output video quality, you're recommended to choose "WMV HD(*.wmv)" from "HD Video" category.
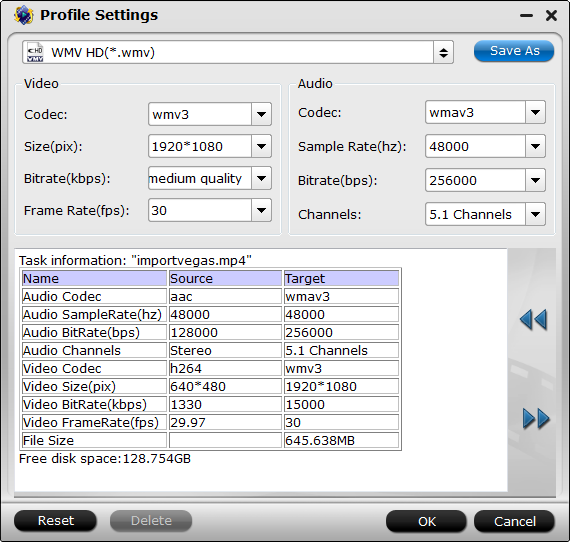
 Tip: If you want to make changes to the video settings like resolution, bit rate and other settings, click the "Settings" button at bottom.
 Step 3. Convert iPhone video to Windows Movie Maker compatible WMV format
When everything is ready, simply click the Convert button and all the imported iPhone video files will be converted to WMV format by this MOV to Windows Movie Maker Video Converter.
Step 4. Import iPhone Videos to Windows Movie Maker
When the conversion complete, open Windows Movie Maker and click Import or Import Video on the left to import your video to the movie collection and drag and drop to the timeline for editing. Then you can share the better iPhone videos to your friends or upload these edited iPhone video to YouTube. Have a good time.
Have more questions about how to import an iPhone Video into Windows Movie Maker, please feel free to contact us>> or leave a message at Facebook.
More Topics:
Step 3. Convert iPhone video to Windows Movie Maker compatible WMV format
When everything is ready, simply click the Convert button and all the imported iPhone video files will be converted to WMV format by this MOV to Windows Movie Maker Video Converter.
Step 4. Import iPhone Videos to Windows Movie Maker
When the conversion complete, open Windows Movie Maker and click Import or Import Video on the left to import your video to the movie collection and drag and drop to the timeline for editing. Then you can share the better iPhone videos to your friends or upload these edited iPhone video to YouTube. Have a good time.
Have more questions about how to import an iPhone Video into Windows Movie Maker, please feel free to contact us>> or leave a message at Facebook.
More Topics:
Collected some info from GoPro forum, there are more than one threads mentioned the GoPro Studio issues while editing or converting GoPro footage since it’s released: won’t import videos, crashes, can’t output files... In fact, GoPro Studio is a free software makes it easier than ever to create professional-quality videos with your GoPro content. While, it’s still not a solid software for us to handle GoPro video clips. In this case, what you need is a GoPro Studio alternative that works on Windows or Mac.I found iFastime Video Converter Ultimate is just suitable to your needs, which is an all-in-one video converter and editor. This video app is an all-in-one editor and even video player. With its built-in editing feature, it allows you to trim clips, crop videos, add effects, insert subtitles, etc as GoPro Studio does. What's more, this video app is also professionalized in converting videos in all formats, including GoPro (4K) MP4, MTS, MXF, AVI, MKV, FLV, MPG format and make them best compatible with YouTube, Vimeo, Final Cut Pro, Galaxy Tab and more video sharing websites, professional editing programs and portable media devices. And and downsize 4K videos to 1080p with high quality kept and more. Overall, you can effortlessly find this program can be seen as the best GoPro Studio alternative and is even much better than it.If you are running on Mac, iFastime Video Converter Ultimate for Mac is right for you.How to use GoPro Studio Alternative to convert/edit videosStep 1. Import video filesLaunch the video converter first. To import the local videos you want, you can click the "Add video" button. A pop-up window will lead you to locate your local files. Or you can directly drag the videos you want to this program. Batch conversion is supported.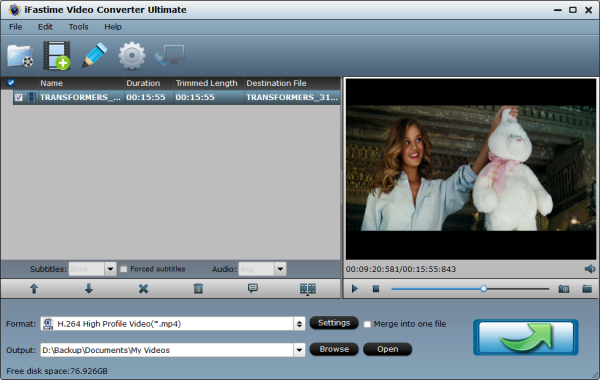 Step 2. Select output format you want Click the "Format" icon, and then find the video format you want. As you can see, various video formats like MOV, MKV, FLV, WMV, AVI, etc. are provided. You can also choose the icon of iPhone, iPad, iPod, Final Cut Pro, Samsung, Android, etc. to get videos with best settings for the selected device/software.
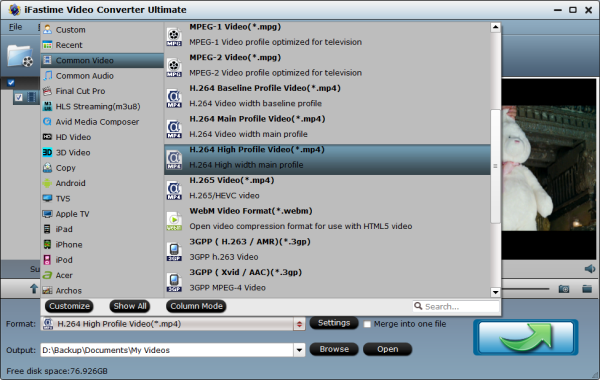 Tip: If you want to customize the output video quality, you can click the "Settings" button to open the Settings window and set video resolution, frame rate, bit rate, codec, etc.
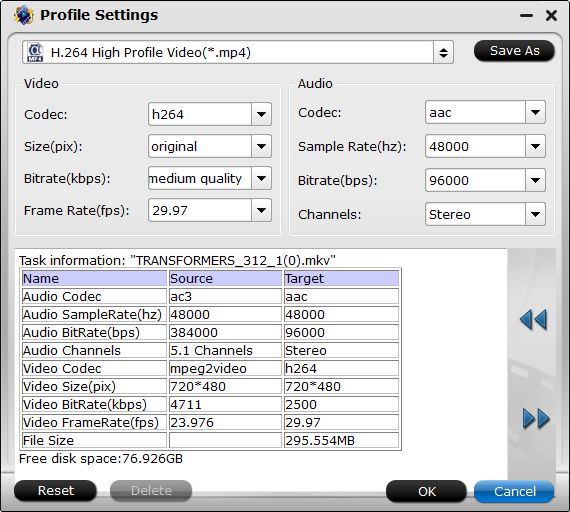 Step 3. Edit videos files you ownFar more than a video conversion program, it provides some video editing functions: trim video into smaller segments; remove unwanted objects from video; brand your video by embedding a watermark; importing subtitle files in .srt or .sst format to video files.
- Trim: You can use the “Trim” function to remove the unwanted segments by deciding where to start and where to end when converting the selected clip.
- Crop: With the “Crop” function, you can remove the black edges around the image.
- Text Watermark: Check “Enable”, you can add your desired text watermark to the selected video, you can also drag the text watermark on the preview screen to adjust its position, or set text font, color, size and style.
- Image/Video Watermark: Tick off “Enable”, you can apply image or video watermark to the selected video. The location for the image/video watermark can also be set by dragging on the preview screen.
- Effect: From effect drop-down option, you can select special effects like: Simple Gauss Blur, Flip Color, Invert, Aged Film to apply to your source video. In Color Control section, you can change color by adjusting brightness, contrast, saturation. You can also check “Deinterlacing” to keep good image quality.
- Audio Editor: You can remove the original audio from video or replace the original video with another audio, you can also set audio fade in or fade out effects.
- Subtitle: Check “Enable”, you can add *.srt or *.ass/*.ssa subtitle files to the video as hard subtitles.
Step 4. Start conversion After all the settings are OK, click the "Start conversion" button to start converting videos with ultra fast speed. After the conversion, just click Open button to locate the output files. You can now use your converted video files anywhere you want them. Wish the best alternative to GoPro Studio help you truly.Additional Tips:If you got some GoPro MP4 videos and you want to edit with a more professional option, Adobe Premiere Pro, Final Cut Pro are all the good choices. While, as we know these NLEs are not able to ingest GoPro videos in H.264 codec. In this case, the recommended GoPro Studio Alternative can be used to transcode GoPro videos to Adobe PP/FCP/iMovie compatible format. Have more questions about best alternative to GoPro Studio, please feel free to contact us>> or leave a message at Facebook.More Topics:
A growing number of professional digital camcorders tend to record videos in the MXF format, such as Sony XDCAM, Panasonic HVX200/HPX300/HPX500 P2 HD, Canon XF100/XF300/XF305/C300/C500 and much more. Users who want to edit MXF footage with Sony Movie Studio usually run into incompatibility issue. In fact, MXF is not the supported list of Sony Movie Studio, like Sony Vegas. It's not supported natively. But what to do if you just have a Sony Movie Studio installed and wanna use MXF files to create you own masterpieces? The easiest way to solve MXF issues in Sony Movie Studio is to convert MXF video to Movie Studio editable format, such as MPEG-4. Here iFastime Video Converter Ultimate is suggested, it can convert MXF to a more editing-friendly format, such as MPEG-2 for the Movie Studio. (read review)This program is fully compatible with MXF format and can convert MXF file to any popular format you want, including but not limited to MP4, MPEG, H.264, VOB, AVI, MOV, FLV, MKV, MOD, WMV, ASF, 3GP, etc. If your MXF files are large, it can also compress and convert MXF to a smaller size so you can easily edit with Sony Movie Studio. By the way, if you use Mac computer, please go to get the Mac version here.Free Download or Purchase iFastime Video Converter Ultimate: Other Download:
How to Convert MXF files to MPEG-2 for Sony Movie StudioStep 1. Add MXF files to MXF to Sony Movie StudioRun this MXF Converter after installation. Then drag and drop MXF files from Finder to the application.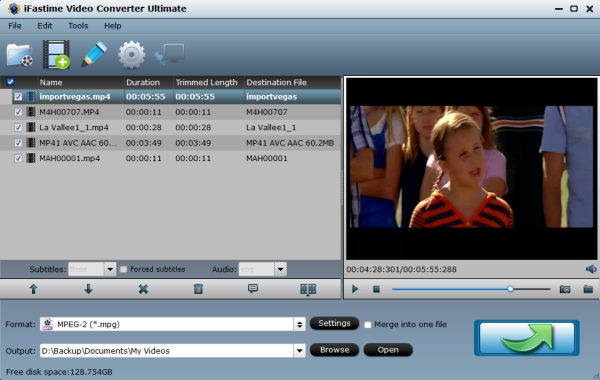 Step 2. Choose an output formatNext, go to the Format tray at bottom and select an output format. The formats are grouped into several categories like Video, Device, Editing. Find the output format you want. All the imported MXF will be converted to the selected format. By clicking the "Settings" button you can make changes to the default video settings like Resolution, Frame Rate, Bit Rate, etc.
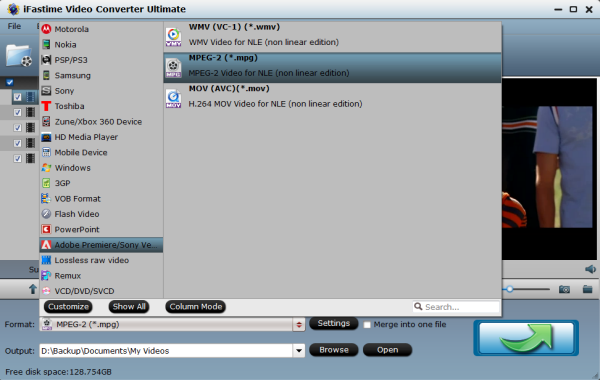 If you want to combine all MXF video files into one file, check the "Merge" option at bottom.Step 3. Start to convert MXF to MPEG-2 for Sony Movie StudioLastly, click the "Start conversion" button and all the conversion tasks will be finished automatically by this MXF Video Converter. The output path will open when all MXF files are converted to your desired format. You can import the converted MXF files with Sony Movie Studio for editing. Or transfer to your device to play without any hassle.iFastime Video Converter Ultimate not only supports MXF format, but also over 100 video/audio formats. It helps you convert MXF and other formats of files at ultrafast speed and keeping the original video quality. Besides, this powerful video converter also can convert other videos including MP4, AVI, MOV, MTS, etc to Vegas Pro, Pinnacle Studio,Windows Movie Maker, Avid Media Composer, Adobe Premiere Pro and more NLE supported format on Windows. Importing media into Sony Movie Studio:Importing media allows you to add media to the Project Media list for use in your project without adding it to the timeline.1. From the Project menu, choose Import Media. The Import Media dialog is displayed.2. Navigate to and select a media file to add the Project Media list. You can use Ctrl or Shift to select multiple files.3. Click Open. The media file is added to the Project Media list.Have more questions about how to work with MXF footage in Sony Movie Studio, please feel free to contact us>> or leave a message at Facebook.More Topics:
Editing movies takes practice, patience, and an artistic eye, but anyone can learn to expertly edit a movie with enough time. Once you feel comfortable in an editing program like windows movie maker, Adobe Premier or Sony Vegas Pro, the range of control over your next video becomes almost infinite. Part science, part art, and accessible to almost anyone, learning to edit videos is one of the most important things a filmmaker of any skill levels can do. Here offers you top video editor for windows 10, you can choose freely as you need.Top Video Editors for Windows 10Windows movie makerWindows Movie Maker is hands down most easy to use video editing program I have worked on. It does not require any prior editing experience. Within 20 minutes of usage, you can add titles to your video, add effects, synchronize audio and what not. If you haven’t used any video editing software in the past, you can start from here. WMM does not come by default in Windows 10, you have to download it from Microsoft website.Pinnacle StudioThe design of this program points out to intuitive software that you can rely on for professional video editing. It offers simplicity for those who are beginning with video editing and experienced ones as well. Standout features for Pinnacle Studio are making photo slideshows, deleting needless scenes from a video, 2D transitions, video effects and adding audio or text overlays. You should not have reservations for choosing to have Pinnacle Studio as the preferred program for video editing anytime you have such needs to satisfy.Corel VideoStudioCorel VideoStudio comes from the same family of CorelDraw, the popular graphics suite. Powered by 64-bit power, Corel VideoStudio is something great, as the tool makes creative video editing a simple task for everyone. Also, when you purchase the ultimate version, you can get features such as variable speed in video editing, easier ways to create overlays and titles, multi-monitor support, DSLR enlarged mode, stop-motion animation etc. SONY VEGAS PROSony Vegas Pro can be called the BIG BROTHER of Sony Vegas Movie Studio, as it offers enhanced features and it will need you to pay more. Sony Vegas Pro brings a number of intuitive yet productive features such as powerful effects, support for iOS devices through corresponding application, stereoscopic 3D editing, enhanced audio control, support for 4K video, multi-track audio environment, impressive media management, DVD Layout and Design along with one option to preview what you have done. Of course, Sony Vegas Pro will be the best video editing software for those professionals who are ready to pay.iFastime Video Converter UltimateThis is an easy-to-use software program that is suitable for both beginners and experienced editors. When you add video to the interface, then click “Edit selected task”, there are basic editing tools that are offered by this program and include split, trim, merge, rotate and crop among others, add texts watermark.
- Trim: You can use the “Trim” function to remove the unwanted segments by deciding where to start and where to end when converting the selected clip.
- Crop: With the “Crop” function, you can remove the black edges around the image.
- Effect: From effect drop-down option, you can select special effects like: Simple Gauss Blur, Flip Color, Invert, Aged Film to apply to your source video. In Color Control section, you can change color by adjusting brightness, contrast, saturation. You can also check “Deinterlacing” to keep good image quality.
- Audio Editor: You can remove the original audio from video or replace the original video with another audio, you can also set audio fade in or fade out effects.
- Subtitle: Check “Enable”, you can add *.srt or *.ass/*.ssa subtitle files to the video as hard subtitles.
You can use those to personalize your videos. You can also extract audio from video. Read review to learn more.It supports almost all video/audio formats and transcode video formats as you need, easily make movies, edit audio, apply effects and share your new movie on YouTube, Facebook, Vimeo, TV, iPhone, iPad, iPod, Samsung, Amazon, HTC, PSP, and more. Just download and have a try.Free Download or Purchase iFastime Video Converter Ultimate: Other Download:
Have more questions about how to edit videos on Windows 10, please feel free to contact us>> or leave a message at Facebook.More Topics:
Sony Vegas Pro is a professional image editing software, which now upgrade to Vegas Movie Studio. It is a professional, implified and efficient version. Many people will have issues while editing Canon, JVC, Panasonic, Sony, BlackMagic, Ikegami .mxf video files in Sony Vegas Pro. We know MXF (Material eXchange Format) is a container format for professional digital video and audio media defined by a set of SMPTE standards, why that happens. Look below to make it clear. First we need to know the Sony Vegas Pro supported formats, although Sony claims Vegas Pro can work with MXF format. Here is the list of Sony Vegas supported input formats:MOV, WMV, H.264, AA3, AAF, AIF, ASF, AU, AVC, AVI, BMP, BWF, CDA, DIG, DLX, DPX, DV, EXR, FLAC, GIF, HDP, IVC, JPEG, AVCHD, M2T, M2TS, MVC, Sony MXF (XDCAM and HDCAM SR), MP3, MP4, M4A, MPEG-1 and MPEG-2 video, OGG, MPO, OMA, Panasonic MXF (DVCPRO, AVC-Intra) PCA, PSD, QT, R3D, PNG, SFA, SND, TIFF, TGA, XAVC S, W64, WAV, VOX, WDP, WMA, XAVC Intra MXFObviously, Sony Vegas Pro doesn't support MKV as an input format so it is impossible to import MXF files into Sony Vegas directly.To fix the problem, the reliable workaround we've found so far is to transcode MXF to a fully compatible format with Sony Vegas Pro. Along with some help from third-party programs, you can achieve your goal smoothly. This will help you import the MXF file correctly and save the rendering time.Where to find such third-party programs. Luckily, here is iFastime Video Converter Ultimate, which is able to complete this task efficiently. With this great converter, it will not be a problem to open any MXF files in Sony Vegas Pro by converting MXF files that you want to edit in Sony Vegas Pro to Sony Vegas Pro supported formats like AVI, MPEG-2, DV, MP4, etc. Not just MXF, it also enables you to convert almost all videos like MP4, MOV, AVI, WMV, FLV, ASF, MKV, TOD, MOD, RM, RMVB, DV, etc to Sony Vegas Pro formats to let you import them to Sony Vegas Pro for editing.Apart from video, this powerful converter also allows you to convert any audio files to Sony Vegas Pro compatible formats so that you can edit your audio clips in Sony Vegas Pro, at will.Simple Steps to Convert MXF to Sony Vegas Pro Editing-Friendly FormatsStep 1. Install and launch the MXF to Sony Vegas Pro converter. Click the “Add video” button to import your MXF videos to the program. (Note: batch conversion is supported, so you can load more than one file to save time.)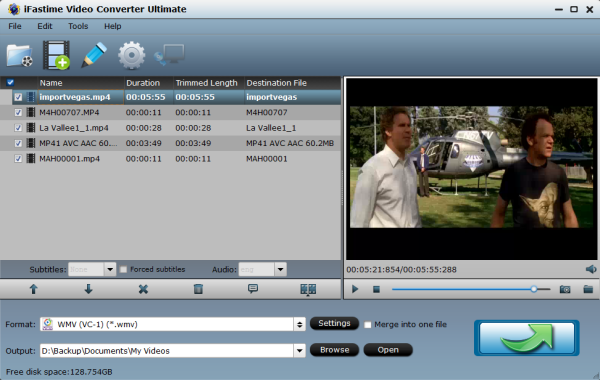 Step 2. Select output format. Click the format column to choose output format. For Sony Vegas Pro 13/12/11/10 editing, you can choose "WMV (VC-1) (*.wmv)" under "Adobe Premiere/Sony Vegas" option.
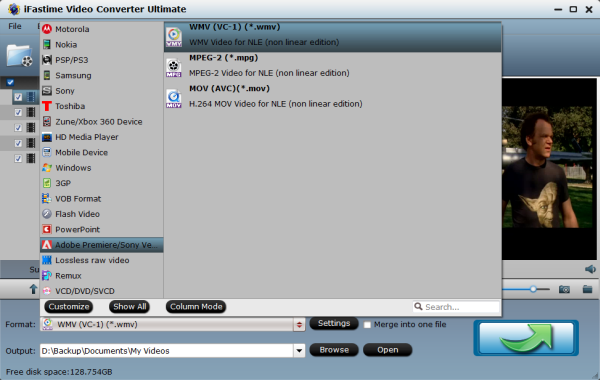 Step 3. Finally, click "Start conversion" button and your MXF files will be converted into WMV files ready to be imported into Sony Vegas Pro 13/12/11/10.Note: While importing MXF clips into the program for conversion, please make sure you have the entire MXF file structure as it saved on your camcorder's P2 card. If you only have some loose .MXF clips, your files will have image only without audio. See MXF file structure on Panasonic's P2 card as below. (See how to solve .mxf files with no audio issue)More Topics:
Adobe After Effects CC is software primarily used for creating motion graphics and visual effects. Your creativity will be extensively boosted by this fantastic app. However, a bit frustrating. You will find your MXF footages from Sony XDCAM are not well supported by After Effects CC on Mac.As we all know, After Effects CC supports MPEG-1, MPEG-2, and MPEG-4 codec formats: MPEG, MPE, MPG, M2V, MPA, MP2, M2A, MPV, M2P, M2T, M2TS (AVCHD), AC3, MP4, M4V, M4A. So you can receive an error message or the video does not display correctly when you import MXF files to After Effect CC, because MXF is not in After Effects CC supported file formats list. To import MXF to After Effect CC smoothly, you just need to encode MXF to MPEG-2 MPG (the most compatible video codec for After Effect CC) file format and then import the converted MXF to After Effects CC for editing. To achieve this, iFastime Video Converter Ultimate for Mac is the best solution, which can transform MXF files to MPEG-2 so you can easily play them and edit them as you wish on Adobe After Effects CC. With it, you can convert MXF files to various video/audio formats without losing any video quality. This MXF to After Effect CC Converter is designed to transform all types of MXF videos. It also allows you to convert MXF to any other format as you want for importing into different design applications, such as Premiere Pro, After Effects, iMovie, FCP , Avid Media Composer, and more. Apart from Standard output, it also offers HD and 3D output. MXF video converter still provides many optimize presets for popular devices and the list include 3D TV, iPhone 5, iPad 4, iPad mini, iPod Pro, PSP, Xbox, and more. More functions like taking snapshots, editing MXF files, merging all videos into one, etc. are also supported by this MXF file converter. Read review to learn more. Just download it and follow the workflow using After Effects CC with MXF files on Mac OS X El Capitan.Free Download or Purchase iFastime Video Converter Ultimate for Mac:
 Other Download:
Guide: Convert MXF footage for After Effects CC on MacStep 1. Download the best MXF conversion software. Install and run this MXF to After Effects CC Converter, and directly drag and drop MXF videos, or you can click “Load Files” button to upload the footage.
Other Download:
Guide: Convert MXF footage for After Effects CC on MacStep 1. Download the best MXF conversion software. Install and run this MXF to After Effects CC Converter, and directly drag and drop MXF videos, or you can click “Load Files” button to upload the footage.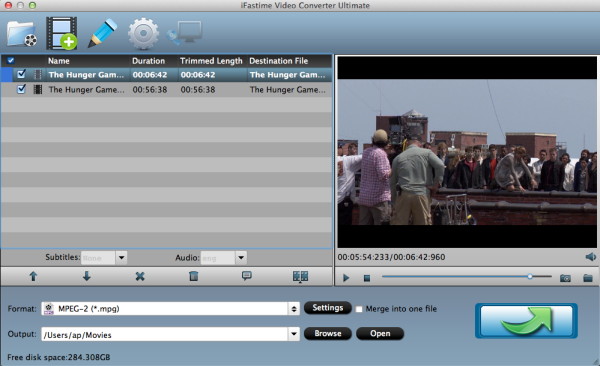 Step 2. Select output video format compatible with After Effects CC. Click the drop-down list in the “Format” to get the format box. “Adobe Premiere/ Pro/Sony..” > MPEG-2 (*.mpg) is one of the best compatible video formats for you to choose. You also can choose WMV (VC-1)(*.wmv)/MOV(AVC)(*.mov)
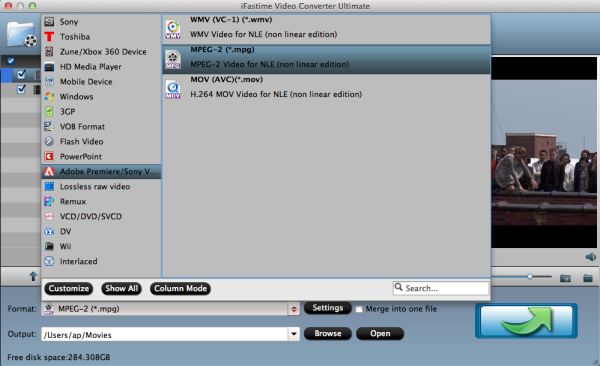 Tips: you can click “Settings” to adjust bitrate, frame rate and size(pix), etc for editing on your After Effects CC.
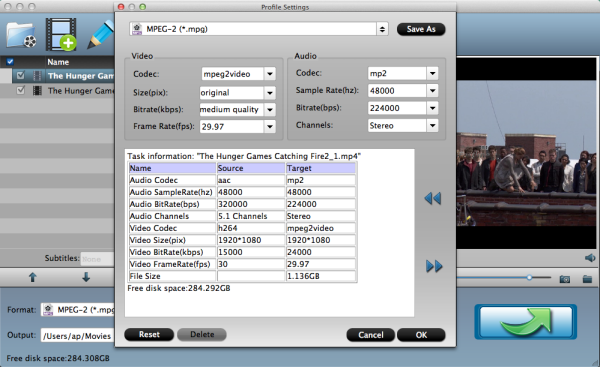 Step 3. Convert MXF for editing on After Effects CC. Click the “Start conversion” button to start converting MXF to After Effects CC editable format on Mac (Mac OS X 10.11, 10.10, 10.9, 10.8, 10.7, 10.6). When the conversion finished, you can edit the converted MXF video in After Effects CC smoothly.Have more questions about how to transcode MXF to After Effects CC for editing, please feel free to contact us>> or leave a message at Facebook.More Topics:
MKV file is a Matroska video and audio multimedia file. It is a container like MOV and AVI, providing support for a huge number of different video, audio and subtitles compression formats. Recently MKV has become one of the most used container formats for high definition video content online. However, when we load MKV movies to Sony Vegas Pro 13/12, Sony Vegas Pro 13/12 can’t recognize MKV.As we all know, Sony Vegas Pro 13/12, a video and audio editing software, can support video formats, like RM, WMV, AVI, MOV, MPEG-1, MPEG-2, etc. and audio formats, like AIF, MP3, WAV, RM, WMA, etc, but MKV is not included. The common method to load MKV files to Sony Vegas Pro 13/12 effortlessly is converting MKV to Sony Vegas Pro 13/12 supported formats (shown as in the second paragraph). Luckily, iFastime Video Converter Ultimate is able to complete this task efficiently.With this great converter, you can easily load MKV files to Sony Vegas Pro 13/12 by converting MKV files that you want to edit in Sony Vegas Pro 13/12 to Sony Vegas Pro 13/12 supported formats like WMV, AVI, MPEG-2, DV, MP4, etc. Besides converting MKV to Sony Vegas Pro 13/12, it also helps to convert MP4, Apple ProRes, FLV, WebM, ASF, MXF, AVCHD, etc to Sony Vegas Pro 13/12 video format. It works on Mac and Windows well. Below is the step-by-step guide on converting MKV to Sony Vegas Pro 13/12 supported video formats to help those who are in the trouble out.Free Download or Purchase iFastime Video Converter Ultimate: Other Download:
How to convert MKV to Sony Vegas Pro 13/12 compatible format?Step 1. Add MKV filesInstall and launch iFastime Video Converter Ultimate, and then click “Add Video” button to import your MKV files to the software. You can drag and your videos and drop them to it.Step 2. Select output formatClick the format column to choose output format. For Sony Vegas Pro 13/12 editing, you can choose "WMV (VC-1) (*.wmv)" under "Adobe Premiere/Sony Vegas" option.Tips: If the default settings do not fit your needs, you can click "Settings" button to customize output video parameters like bitrate, channels, frame rate, etc, such as to set higher bitrate to get much better image quality. In general, the higher video bit rate, the larger output file size, and vice versa. 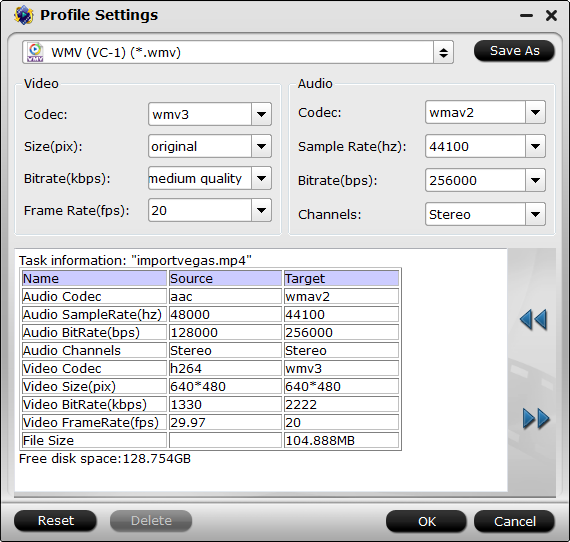 Step 3: Start the conversionWhen all settings are ready, click the “Start conversion” button to start converting your MKV videos to Sony Vegas Pro 13/12 WMV files. The progress bar will show how much time is needed. When the conversion completes, get the videos and run Sony Vegas Pro 13/12 to import them for editing.Have more questions about how to load MKV movies to Sony Vegas Pro 13/12, please feel free to contact us>> or leave a message at Facebook.More Topics:
Christmas is the best time to gather people together and make the big sale. As always, iFastime is dedicate to providing high quality and easy-to-use media conversion tools for families and individuals, offering the maximum possibilities for people to share laughter and tears of the year to family members and friends. Every day from December 7th 2015 to 31 January, 2016, iFastime offers 20% OFF on its best-selling iFastime Video Converter Ultimate for Mac to the fans on Facebook. Just seize the last chance!
 20% off iFastime All-In-One iFastime Video Converter Ultimate for Mac
iFastime Video Converter Ultimate for Mac is a powerful but easy-to-use Blu-ray/DVD/video conversion software. It owns the ability of converting videos to a broad range of popular formats and devices like 4K, H265, m3u8, AVI, MPG, MP4, WMV, MKV, MOV, M4V, iPhone 6s, iPhone 6s Plus, iPad Air 2, iPad Pro, iPad mini 4, Samsung Galaxy Note 5, Apple TV and more on Mac OS X. New pop devices are keeping added. It is fully compatible with Mac OS X El Capitan and here is troubleshot-tings.
What are the characteristics that distinguish iFastime from others? The first and perhaps the most important point are the exclusive optimization technique and sharp pictures. It completely avoids the disproportionate aspect ratio and dull color of the output images, and is able to make the output video shown on the portable device in full screen. Secondly, users can select resolutions of the output video by simply dragging the number axis. In addition to the powerful converting function, it is also a video editing software. Like, merge multiple videos; trim and crop video; add special effects to video; inserting subtitles. It is designed and developed to deliver gratitude to your concern and support. We hope it can help you enjoy more Christmas videos and enjoy your life to the full.
Now at only $36.76, the perfect one-stop DVD/Blu-ray backup, conversion and playback solution is at your service.
The purchase link of this 20% OFF iFastime Video Converter Ultimate for Mac is here:
Buy Now
Learn more about iFastime Surprise Xmas Promotion 2015 at:
http://bit.ly/1NEtp88
About iFastime
Founded in 2015, iFastime creates expert multimedia software applications that help consumers access, transfer and share their digital content across different devices that range from PC, Mac, tablets, smartphones to HD media players, game consoles and home theatre systems.
On the basis of computer OS, iFastime products are divided into two categories – Windows solutions and Mac solutions, spanning across video converting, editing and enhancing.
With creativity, expert knowledge as well as cutting-edge technology, iFastime helps consumers throughout the world enjoy more in a digitally connected audio-visual world.
To contact us, please send email via admin@ifastime.com
More Topics:
Source: http://itunesky.com/2015-christmas-gifts-at-ifastime/
20% off iFastime All-In-One iFastime Video Converter Ultimate for Mac
iFastime Video Converter Ultimate for Mac is a powerful but easy-to-use Blu-ray/DVD/video conversion software. It owns the ability of converting videos to a broad range of popular formats and devices like 4K, H265, m3u8, AVI, MPG, MP4, WMV, MKV, MOV, M4V, iPhone 6s, iPhone 6s Plus, iPad Air 2, iPad Pro, iPad mini 4, Samsung Galaxy Note 5, Apple TV and more on Mac OS X. New pop devices are keeping added. It is fully compatible with Mac OS X El Capitan and here is troubleshot-tings.
What are the characteristics that distinguish iFastime from others? The first and perhaps the most important point are the exclusive optimization technique and sharp pictures. It completely avoids the disproportionate aspect ratio and dull color of the output images, and is able to make the output video shown on the portable device in full screen. Secondly, users can select resolutions of the output video by simply dragging the number axis. In addition to the powerful converting function, it is also a video editing software. Like, merge multiple videos; trim and crop video; add special effects to video; inserting subtitles. It is designed and developed to deliver gratitude to your concern and support. We hope it can help you enjoy more Christmas videos and enjoy your life to the full.
Now at only $36.76, the perfect one-stop DVD/Blu-ray backup, conversion and playback solution is at your service.
The purchase link of this 20% OFF iFastime Video Converter Ultimate for Mac is here:
Buy Now
Learn more about iFastime Surprise Xmas Promotion 2015 at:
http://bit.ly/1NEtp88
About iFastime
Founded in 2015, iFastime creates expert multimedia software applications that help consumers access, transfer and share their digital content across different devices that range from PC, Mac, tablets, smartphones to HD media players, game consoles and home theatre systems.
On the basis of computer OS, iFastime products are divided into two categories – Windows solutions and Mac solutions, spanning across video converting, editing and enhancing.
With creativity, expert knowledge as well as cutting-edge technology, iFastime helps consumers throughout the world enjoy more in a digitally connected audio-visual world.
To contact us, please send email via admin@ifastime.com
More Topics:
Source: http://itunesky.com/2015-christmas-gifts-at-ifastime/
The .mpg format is used for any video or MPEG animation using the MPEG-1 or MPEG-2 codec, both of which were designed for lossy compression of audio and video. You may have several .mpg files from your camera, have problem with importing MPG videos into iMovie for further editing? Or may you have some MPEG/MPG files stored on your Mac and want to use them on iMovie? Yes, if you want to edit videos in MPG/MPEG with iMovie, you'll find that the files grey out.That's because iMovie only supports DV-Standard, HDV, AVCHD, Apple Intermediate Codec, QuickTime Movie and MEPG-4 formats while MPEG is not supported. Luckily, we’ve worked out the solution to solve MPG/MPEG to iMovie importing issues.Well, in order to import MPG/MPEG to iMovie, you can turn to iFastime Video Converter Ultimate for Mac, which can help you convert MPEG clips to Apple Intermediate Codec, iMovie's preferred editing format in Mac OS X El Capitan. Moreover, this professional Mac video conversion tool can help you convert MPEG as well as FLV, H.265, AVI, MKV, MOV, MTS, VOB, MP4, etc. on Mac OS X El Capitan and export the professional encoders, namely ProRes, DNxHD for importing to FCP, Avid Media Composer, etc. flawlessly. You can read review to learn more. Just get it and follow the steps to encode MPG/MPEG clips to iMovie.Free Download or Purchase iFastime Video Converter Ultimate for Mac: Other Download:
How to Convert MPG/MPEG to iMovie for Mac OS X El Capitan?Step 1. Locate MPEG files into the Mac applicationYou can directly drag and drop the MPG/MPEG files to the Mac program, or click the "Load Files" to add the source MPG/MPEG files. The task is operated on Mac OS X El Capitan.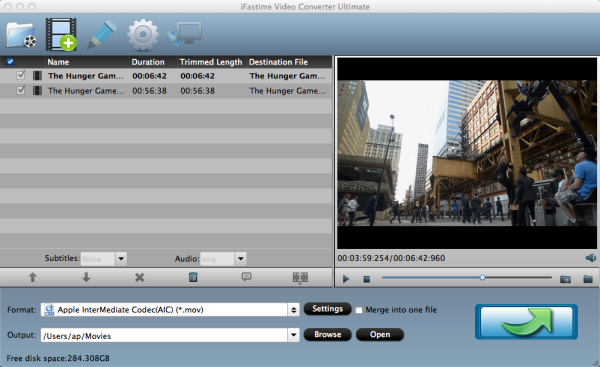 Step 2. Set iMovie as output formatThe product has an optimized preset for iMovie. Therefore, you can directly choose "iMovie" as your output format, which will automatically set the appropriate file format, bit rate, and resolution. You also can simply edit videos with some useful edit functions supplied before the Mac conversion.
 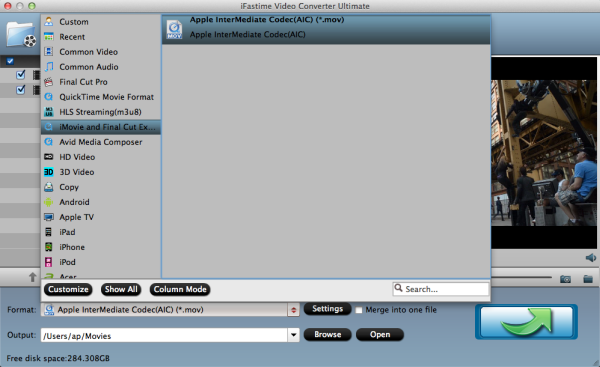 Tips: You can also click "Settings" button in the main interface to customize the output video’s parameters, such as resolution, frame rate, etc.
 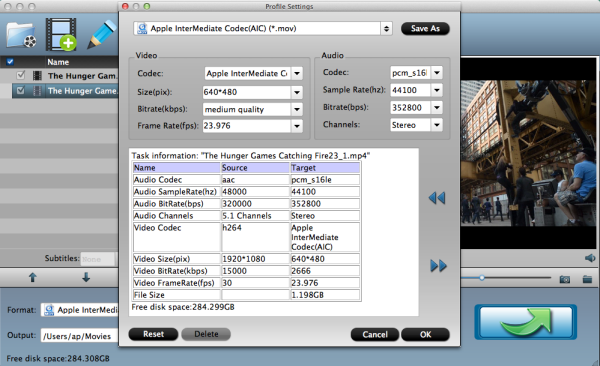 Step 3. Start MPG to iMovie conversion on Mac OS X El CapitanClick the "Start conversion" button, and then leave the Mac Video Converter to do the rest. The converter also works on MacBook, MacBook Pro, MacBook Air, iMac. What's more, if you have something emergency and have to leave from your Mac, you can set the Mac converter to shut down your Mac automatically after the Mac MPEG to iMovie conversion.Have more questions about how to import MPG/MPEG in iMovie on Mac OS X El Capitan, please feel free to contact us>> or leave a message at Facebook.More Topics: