“I have a camera with my masterpiece, but today something unhappy happen.The camera can’t import MTS into DaVinci Resolve on Mac OS X El Capitan. It hints that the format is wrong.”
In practical terms, many people are facing the MTS importing issues with DaVinci Resolve. DaVinci Resolve can support the formats include CinemaDNG, DPX, CIN, QuickTime, DNxHD and native RAW files, MTS is not in the format list, So we need MTS converter to encode MTS files to get the format of DNxHD.
iFastime Video Converter Ultimate is a perfect choice. It can convert not only MTS but also MP4, MKV, MXF, AVI, MP4, and FLV to Avid DNxHD MOV into DaVinci Resolve on Mac OS X El Capitan at a high rate of speed and save much time for importing to DaVinci Resolve. This Video Converter can also help to trim the video to remove the unwanted segments. Read review to learn more.
How do we need to do? Generally, we import MTS files into the converter, then it can help us to convert into DNxHD that we need. You can learn the specific steps as follows.
Free Download or Purchase iFastime Video Converter Ultimate for Mac:


Other Download:
- Cnet Download: http://download.cnet.com/iFastime-Video-Converter-Ultimate/3000-2194_4-76449859.html
- Top 4 Download: http://www.top4download.com/ifastime-video-converter-ultimate/chjkfujg.html
- Free Downloads Center:http://www.freedownloadscenter.com/Multimedia_and_Graphics/Misc__Sound_Tools/iFastime_Video_Converter_Ultimate.html
- Softonic Download: http://ifastime-video-converter-ultimate.en.softonic.com/
- WinSite Download: http://www.winsite.com/Multimedia/Video/iFastime-Video-Converter-Ultimate/
1. Install and launch the MTS file converter, and then click “Add video”to import .mts files.

2. Hit Format bar to select output format. You can choose Avid Media Composer > Avid DNxHD(*.mov) as output format. It is an ideal editing format for Resolve.

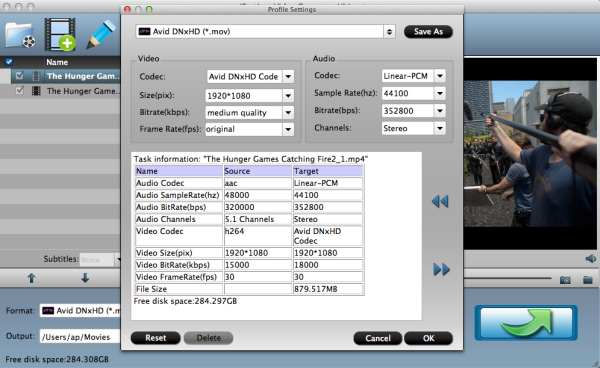
Tip: In case the default settings do not fit your requirement, you can click "Settings" button and enter "Profile Settings" panel to adjust video size, bit rate, frame rate, sample rate and audio channels.
3. Click "Start conversion" button to start transcoding MTS to DNxHD for DaVinci Resolve immediately
Now computer desktop appears DNxHD file, drag the file needed into DaVinci Resolve.
You can import either file-based codecs or capture via camera directly. Since the latter option has both feet in the grave, I’ll ignore it. To import file-based codecs:
- Find the file in the Library panel.
- Double click your clip or Right-click and select ‘Add into Media Pool.’
- The clip is added to your Media Pool.
- You can also import entire directors or a range of clips into the Media Pool.

Now you can edit MTS in DaVinci Resolve on Mac OS X E1 Capitan. Wish you to have good time.
Have more questions about how to work with MTS in DaVinci Resolve Lite, please feel free to contact us>> or leave a message at Facebook.
More Topics:
No comments:
Post a Comment