Wednesday 18 May 2016

How to Solve Black Screen in Windows Movie Maker?

Windows Movie Maker is a feature of Windows Vista that enables you to create home movies and slide shows on your computer, complete with professional-looking titles, transitions, effects, music, and even narration. And when you’re ready, you can use Windows Movie Maker to publish your movie and share it with your friends and family. It might be easy using the Windows Movie Maker but that is not a reason to mean it’s flawless. It works in the same way as any other program and will experience loads of issues one among them being black screen. Very many people have reported encountering this problem which can be solved easily with good troubleshooting basics. This article will help you to fix Black Screen in Windows Movie Maker effectively. 


If you also have encountered the “Black screen” problem in editing videos with Windows Movie Maker, you can do some checks your settings: 

Set sound level: 

As you noted earlier, muting the sound of your Windows Movie Maker can cause the black screen error. As a solution, you should get rid of the mute settings for the program. To achieve that, select the “Timeline” and then expand to both audio and video. Right-click on the option for “Mute” and it will solve the black screen error. Alternatively, set the sound level of all the clips to zero which can be effective in solving the problem. 

Shut unnecessary tasks: 

Why should you have ten tasks running on your computer yet you are using one? That will cause the black screen error and its only wise that you shut down those you don’t need to remain with necessary ones. The more idle tasks you have running on Windows Movie Maker, the higher the chances that the black screen error will occur. Just remain with few tasks and those that you need only to help solve the error. 

Restart Windows Movie Maker: 

Shutting down your program and restarting it for another time is a good way to tackle the black screen error. That will help you to determine if there are any viruses that are causing the black screen error to show up. Once you have noted that, you can scan the program to delete all the spyware and then restart the Windows Movie Maker. That is sure to solve the problem. 

If the above methods still can’t slove your Black Screen in Windows Movie Maker, there is a main reason: the video file type is incompatible with Movie Maker and needs to be converted. So you need one professional video converter which can convert the videos to Windows Movie Maker supported videos for smooth editng. iFastime Video Converter Ultimate (Mac) is your smart choice which has helped many people solve many videos to Windows Movie Maker issues like MP4, H.265, AVI, MKV, M2TS, even iPhone video and other SD/HD/4K to Windows Movie Maker for nice editing without the black screen problem. 

Free download the best Windows Movie Maker converter for Windows: 


Other Download: 
How to Convert videos to Windows Movie Maker for none Black Screen? 

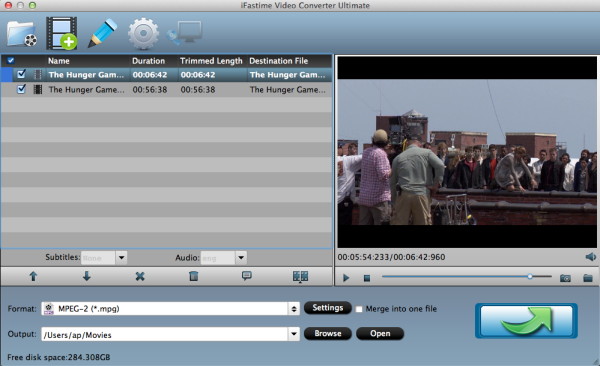
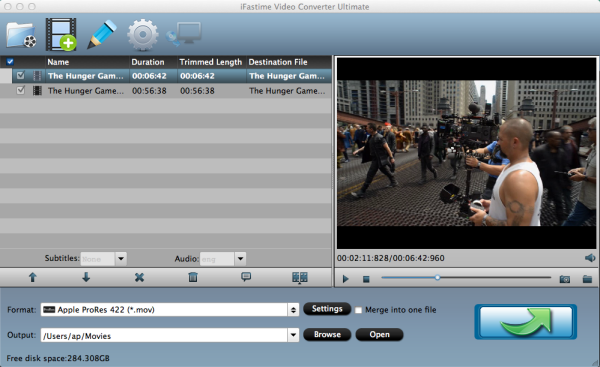
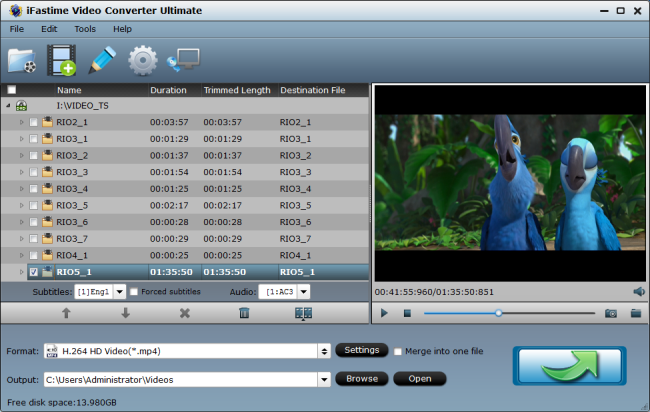
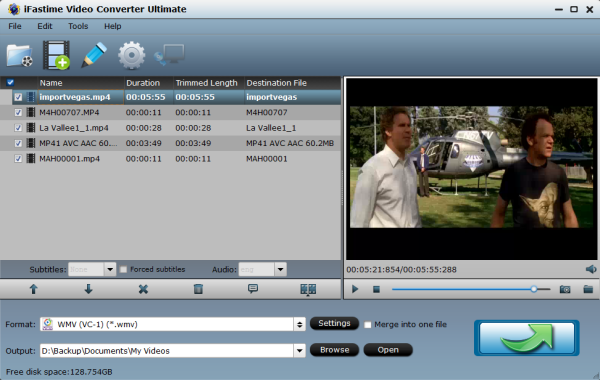
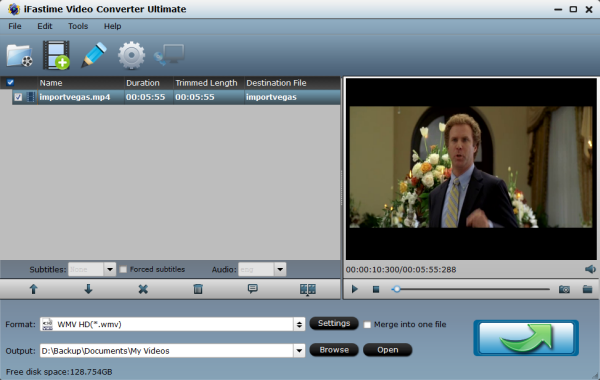
Step 1: Add video files 

Click "Add video" button to import your video files to the software. If you wanna combine the video clips into one file, you can click the "Merge into one file" box. 


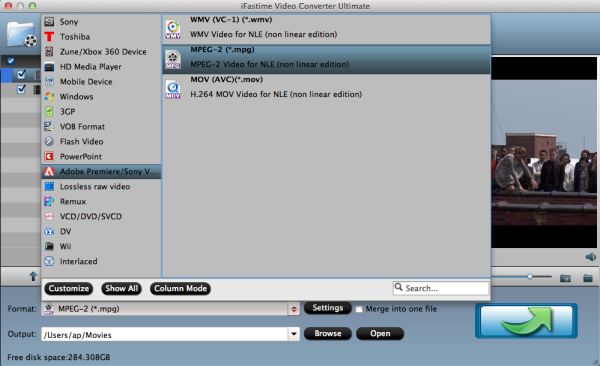
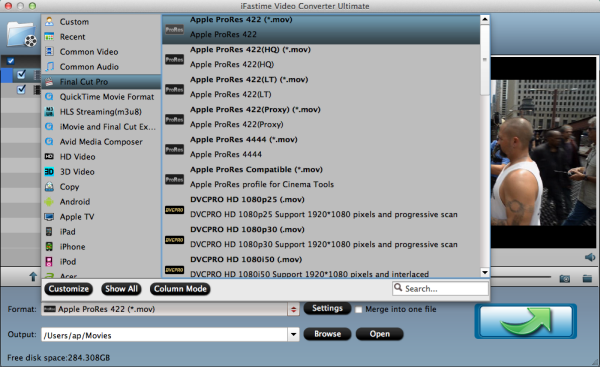
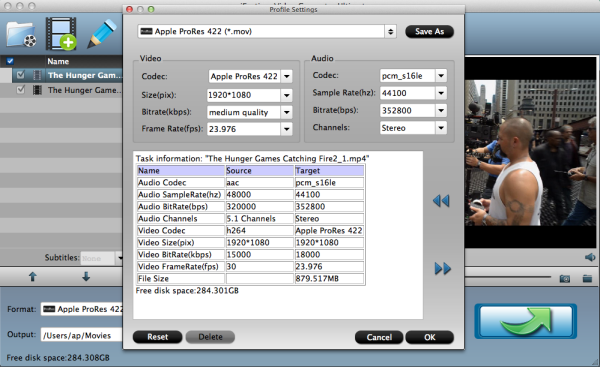
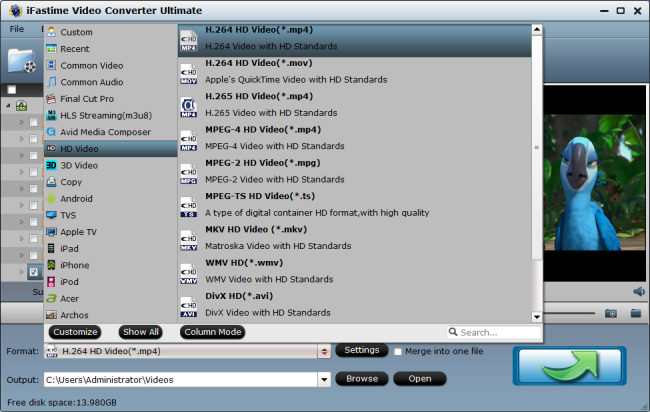
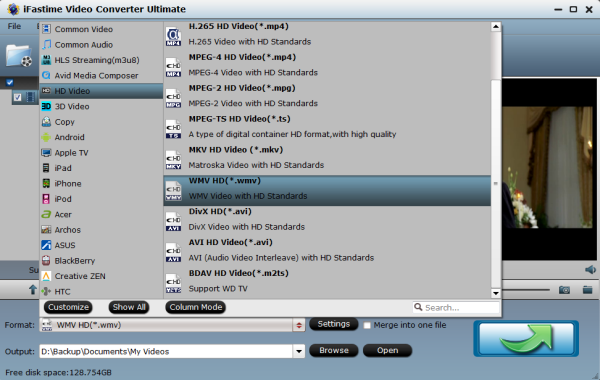
Step 2: Select output format 

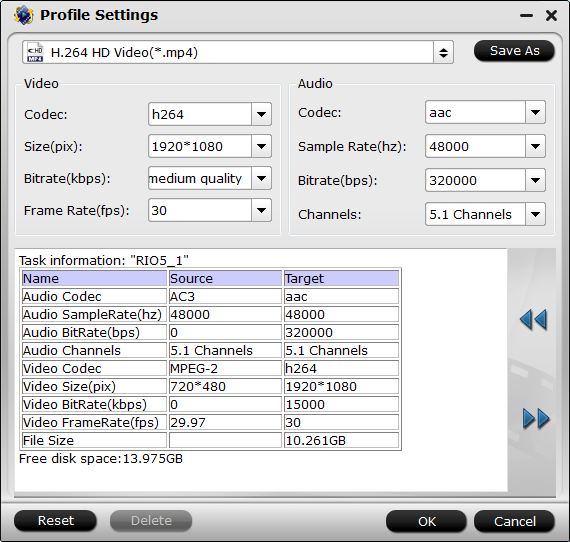
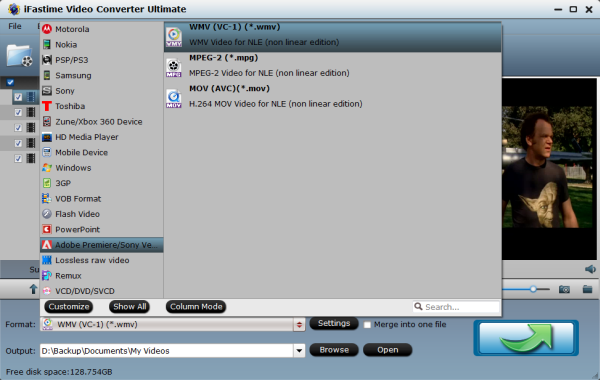
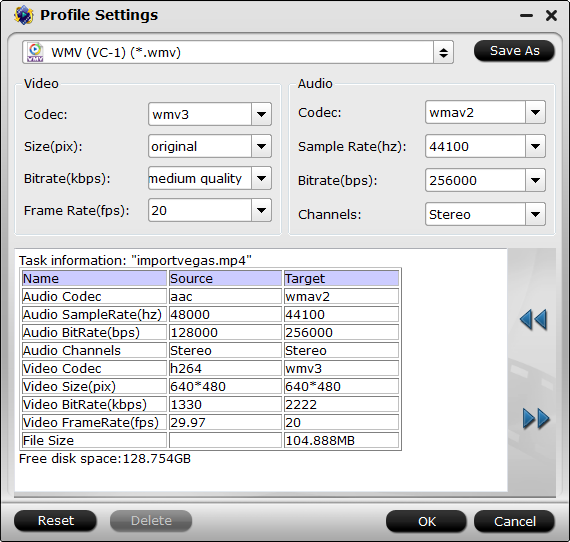
Just go to "Format" bar to choose WMV format in "HD Video" or "Common Video" column. (AVI is also an editable format for Windows Movie Maker.) 


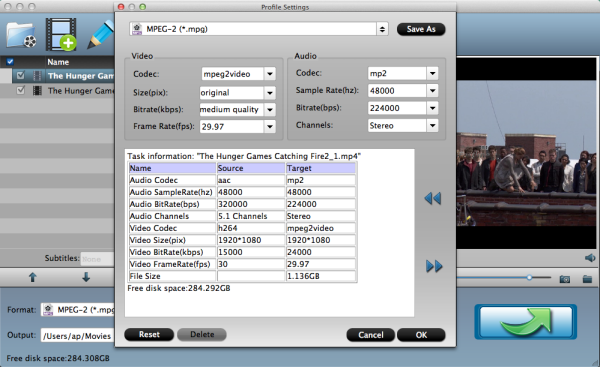
Step 3: Convert video to Windows Movie Maker 

Click the "Start conversion" button under the preview window, the converter will start encoding your video clips for importing the video files to Windows Movie Maker

Have more questions about how to fix Black Screen in Windows Movie Maker, please feel free to contact us>> or leave a message at Facebook

More Topics: 

Source:http://imovieskit.blogspot.com/2 ... ws-movie-maker.html

Wednesday 4 May 2016

Best Pinnacle Studio for Mac or Windows Alternative

Pinnacle Studio is a video editing program originally developed by Pinnacle Systems as the consumer-level counterpart to Pinnacle's former professional-level software, Liquid Edition. Since Pinnacle Studio 9, Studio has been sold in several editions: Studio, Studio Plus and Studio Ultimate, all of which are commercial software. There is some additional functionality in the Plus and Ultimate editions, notably a second video track. This allowed Overlay, A-B Edits, Chroma Key, and Picture-in-Picture. It includes Studio 10, Studio 11, Studio 12, Studio 13, Studio 14, Studio 15, Studio 16, Studio 16, Studio 17, Studio 18, Studio 19. In addition to the desktop versions of Pinnacle Studio, a version of Pinnacle Studio also exists for the iPad. 


Pinnacle Studio is so perfect with many advanced editing features. But the only downside is that Pinnacle Studio can only run on Windows system, not on Mac. So if you are a Mac user, you maybe want to use a Pinnacle Studio for Mac alternative. Here we recommend iFastime Video Converter Ultimate for Mac (Windows) due to its following features: (We will know the particular features through the example as per the step by step guide). 

iFastime Video Converter Ultimate for Mac is a professional video to Pinnacle Studio converter, which can convert any videos including MP4, AVI, MKV, H.265, MXF, MTS etc to Pinnacle Studio editable formats on your Mac (Mac OS X 10.11 El Capitan, Mac OS X 10.10 Yosemite, 10.9 Mavericks, 10.8 Mountain Lion, 10.7 Lion, 10.6 Snow Leopard, 10.5 Leopard) or Windows (10, 8.1, 8, 7, XP, etc). In addition to Pinnacle Studio best alternative, it is also FCP, iMovie, Avid Media Composer, Premiere Pro, Sony Vegas alternative. (read review

Hot edit functions of the best Pinnacle Studio alternative: 

Built-in video editor: As the best video editor for Mac, it provides practical video editing functions: trim video length, crop video size, set special effects, add watermarks, insert subtitles, etc. Click on "Edit" button, the video editor will pop up, then you can do some editing work as below in the video editing window: 

Trim - Choose to reserve the part you need. Just choose the chapter which you need to trim, to set "start time" or "end time", type the portion which you want to save. 
Crop - Remove black edges of your video or just get the scale of this video you want. 
Effect - Adjust the effects by adjusting the parameters, such as: 
Deinterlacing - If there are some stripes on the picture, you can check this option to make a better picture effect. (Checked by default) 
Subtitles - Import your *.srt, *.ass, *.ssa subtitle file you've downloaded to your own videos 


Convert 250+ video/audio to any format you want: 


  • With an ultra-intuitive user experience, anyone can easily encode your source files to all popular video/audio formats like MOV, H.265 MKV, H.265 MP4, M3U8, AVI, WMV, MKV, FLV, 3GP, VOB, ASF, SWF, MP3, M4A, WAV, AAC, OGG, AC3 and more with excellent output quality. 
  • Transcode your movie library to video files with optimized settings to fit your Sony/LG/Samsung/Panasonic TV, iPhone 6s, iPhone 6s Plus, iPhone 7, iPad Air 2, iPad Mini 4, Apple TV (4/3/2/1), PSP, Xbox 360, BlackBerry, HTC, Samsung and more or to native codecs to ensure the best results when using iMovie, Final Cut Pro, Adobe Premiere, Avid Media Composer,etc. 
  • It is also functioned as a 3D movie creator program. With it, you can make 3D movies from both 2D or 3D resources with side by Side by Side, Anaglyph and Top/Bottom 3D effects. 
  • Batch Conversion: Convert multiple files at a time to ensure an efficient conversion.

Free download the Pinnacle Studio Alternative: 


Other Download: 


Have more questions about Pinnacle Studio for Mac or Windows Alternative please feel free to contact us>> or leave a message at Facebook

More Topics: 

Tuesday 19 April 2016

Editing Shadowplay videos on After Effects

InVidia recently released the beta for their new capture technology, "ShadowPlay" which makes it a lot easier for youtubers to capture footage of PC games. However, After Effects fails to handle the audio well, throwing it way out of sync. This apparantly happens because Premiere doesn't support variable framerates especially well. 

Generally speaking, a professional tool like After Effects never expects anything but constant framerates. Unfortunately, one of the ways NVIDIA manages to keep ShadowPlay’s export file sizes low but retain great quality is to utilize variable framerates, but the result is a freshly-exported video with de-synced audio and video – in effect, a useless result. 

In this case, you need to transcode the ShadowPlay videos to After Effects more preferred MPEG-2 or WMV files and then transfer the converted MOV files to After Effects for editing. 

Here I recommend you the best easy-to-use iFastime Video Converter Ultimate for Mac. With this powerful Shadowplay to After Effects video converter,  you are able to to encode any ShadowPlay files to After Effects supported format at super fast speed effectively. (Read review)

Besides optimized video formats for After Effects, specialized video formats are also provided to popular editing software FCP, iMovie, Avid, Adobe premiere Pro .etc for Mac users.  If you have other format issues with these editing software, iFastime Video Converter Ultimate for Mac can also handle your problems immediately. What’s more, if you are a Windows user, just turn to the Windows version iFastime Video Converter Ultimate for help.


Hot search: MP4 to After EffectsMXF to After Effects|4K to After EffectsXAVC-S to After Effects


In a word, just get the right version according to the system of your computers and then follow the step-by-step guide below to convert ShadowPlay videos to edit in After Effects smoothly. 

How to convert ShadowPlay files into After Effects 

Step 1. Load source ShadowPlay footages 

Launch the Video Converter on your Mac, and you can either click “File>Add Video/Audio” button to import ShadowPlay files, or directly drag and drop the files into this program. 


Step 2. Select output format 

In order to edit ShadowPlay files to After Effects, you are required to click drop-sown menu right besides “Format button” you can follow Adobe Premiere/ Sony Vegas column and select MPEG-2 (*.mpg) as output format. 


Tip: You are adviced to adjust parameters like bitrate, frame rate, sample rate and audio channel .etc in “Settings” before conversion. 


Step 3. Start ShadowPlay to After Effects Conversion 

Finally, press the “Start conversion” button; it will start to transcode ShadowPlay footage to MPEG-2 for After Effects immediately. After the conversion process finished, you can easily find the converted ShadowPlay files by clicking “Open output folder”. Now the last thing you need to do is to import the converted shadowplay files into After Effects for smooth editing.

More reading:

Thursday 14 April 2016

Ingest Samsung NX500 4K H.265 in FCP 6/7

It is beginning to be a massive problem for all Samsung NX500 users who want to actually edit the Samsung NX500 4K H.265 video footage in FCP 6/7. Samsung NX500 uses a new codec, H.265 (HEVC) and 40Mbps for its 4K video. This is claimed to have the same image quality, but half the size of 100Mbps H.264 footage make higher quality with smaller size become reality. However, Samsung NX500 4K H.265 and FCP compatibility issue is always troubles many users. Actually, 4K H.265 is not a video format supported by FCP6/7


Video Formats: Apple Animation codec, Apple Intermediate codec, Apple ProRes(all versions), AVC-intra, AVCHD (including AVCCAM, AVCHD Lite, and NXCAM), DV (including DVCAM, DVCPRO, and DVCPRO50), DVCPRO HD, H.264, HDV, iFrame, Motion JPEG(OpenDML only), MPEG IMX(D-10), REDCODE RAW (R3D), Uncompressed 10-bit 4:2:2, Uncompressed 8-bit 4:2:2, XAVC, XDCAM HD/EX/HD422, QuickTime formats.

How to edit Samsung NX500 4K H.265 in FCP 6/7?
A third party software is in need to help get the Samsung NX500 4K H.265 in FCP 6/7 edit task done. Different from common HD videos, the conversion of 4K video requires   higher for video converter. iFastime Video Converter Ultimate for Mac is just the one with advanced converting technology, powerful and reliable conversion abilities according to your requirements. It has the strong ability to convert Samsung NX500 4K H.265 to FCP 6/7. Since there are many video formats supported by FCP 6/7, Apple ProRes format is the best friendly one. iFastime Video Converter Ultimate for Mac provides you with specialized Apple ProRes format in in four versions: Apple ProRes 422 (HQ), Apple ProRes 422, Apple ProRes 422 (LT), and Apple ProRes 422 (Proxy) for edit in FCP 6/7. It also allows you to convert Samsung NX500 4K H.265 files to other editing software like iMovie, Adobe premiere, Windows movie maker, Avid Media Composer, etc. with specialized format. Besides, as the 4K output will take a long time to finish, this wonderful 4K to FCP converter is also available to customize the output resolutions to any size you want. you can downscale the output resolutions to any size like 1080p, 2K for easy upload and storage. (Read review)

Specific steps of converting Samsung NX500 4K H.265 to FCP 6/7

Step 1. Load 4K H.265 files to FCP 6/7

Install the Samsung NX500 4K H.265 to FCP 6/7 4K Video converter program on Mac and run it. It supports batch conversion and merging multiple video clips into one file.


Step 2. Choose output folder.

Click “Browse” button the set output folder.

Step 3. Select output format

Click “Format” dropdown menu, turn to “Final Cut Pro” option, you can see the Apple ProRes format. Generally, you are recommended with Apple PreRes 422(*.mov) as output format. If you wanna faster conversion speed and smaller video size, you can choose Apple ProRes 422 (LT) or Apple ProRes 422 (Proxy). If you have strict requirements for video quality, choose Apple ProRes 422 (HQ) as output formats.


Tip: You can click “Settings” icon to adjust video and audio parameters. Set video resolution, bitrate , frame rate as you want. It’s OK to keep the original 4K video size, but it will taker longer time than changing the video resolution to 1080P or 720p, etc. What’s more, smaller video size is beneficial to transfer to FCP editing software.


Step 4 Start conversion

Hit the “Start conversion” button to start the Samsung NX500 4K H.265 video to FCP 6/7 conversion after all necessary settings. Once the conversion process shows in 100%, click “Open output folder” to get the output videos. If you don’t want to wait for the conversion done, just click “Shut down computer after conversion” on the conversion page.

As you have now finished the Samsung NX500 4K H.265 to FCP 6/7 conversion, you can then freely transfer the converted videos to FCP 6/7 and create a project and start editing 4K video in FCP 6/7 with light speed.

You may also interested in:

Tuesday 12 April 2016

Import all kinds of videos into Camtasia Studio


Camtasia Studio is professional screen recording and video editing software, it can capture any screen movements and actions, including image, audio, cursor, etc and can directly edit the recorded file, including adding various labels, media library, pan-and-zoom, PIP, voiceover, subtitle effects, etc. Camtasia Studio can also support to edit the videos people import from popular devices like iPhone 7/SE, Samsung Galaxy S7/S7 Edge, Phantom 4/3, Go pro camera, Sony Camera and many others. However, you may often encounter problems when importing videos to Camtasia Studio. 

Problems with import videos to Camtasia Studio for edit

1."Hello, I recorded some videos on my sony HD camera and wanted to cut together a highlight video using Camtasia 8.0. The camera saved the files as *.m2ts which Camtasia doesn't seem to be able to read. There is an option to convert the M2TS to WMV or MPEG-2. Now I can import the *.wmv media but it only saves in 640x480 instead of 1080i which is what I want. The MPEG-2 is the file that gets the codec Error. Is there anything I can do to get the M2TS video file worked with Camtasia or are they just both incompatible?"

2.I just updated from Camtasia 7 to Camtasia 8. I could import .mov files with Camtasia 7. Now Camtasia 8 will import .mov files but not read them and stop and start not to respond in front of a .mov file. Can you help? I regret this update. I am greatly frustrated.......

3.Hello techsmith staffs! i'm having a problem on importing video files. I just wonder why can't I import .avi files on camtasia. I can only import .mpg. can you please attend to my concern? I badly need your solution right now. Its for our project. Thank you!

Why such format issues happen to you?

Like many other video editing programs, Camtasia have restriction for video and audio formats, It means that those videos incompatible cannot be imported to Camtasia Studio directly.

Camtasia supports AVI, .WMV, MPEG-1, .MP3, .WAV, .WMA, and .MOV (QuickTime) files. It does not support AVCHD files (.m2ts, .mts, and .m2t), Video_TS, MPEG-2, MOD, Ogg, WebM, .RM (RealPlayer), .FLV (Flash Video), 3GPP, and SWF created outside Techsmith products.  

However, as the problems listed above, although some video formats like MOV, AVI claimed to be supported by Camtasia Studio, we may still encounter video won’t be edit by it issue. This is because MOV, AVI and other video formats are just containers, each format will have different codecs. 

In a word, due to the Camtasia Studio video restriction and format issues, M2TS, MOV, AVI and other formats cannot be imported to Camtasia Studio for editing.

How to Import all kinds of Videos into Camtasia Studio

For the video format that supported by Camtasia Studio, you can directly transfer them through USB or other wireless method from your computer or ohter portable devices. But for the unsupported formats, you can choose to render videos with Camtasia Studio, but generally speaking, it will take you a lot of time to wait for the render conplete, and not all the video formats can be renderred successfully. Then you have a third choice: convert unsupported formats with a third party software then imported to  Camtasia Studio.


Here we recommend iFastime Video Converter Ultimate which has strong ability to convert all kinds of videos to Camtasia Studios. This powerful video converter can also convert all kinds of videos to other editindg software and devices like Sony Vegas Pro, Windows Movie Maker, Pinnacle StudioPowerDirector, iPhone 7/SE/6s/6, iPad Mini (2/3/4), iPad Air (2/3), iPad Pro, etc. In addition, it is also a video editing and creating software. It will help you cut off videos to create clips, crop/expand video edges, merge multiple video files to cut together a highlight video, and even add external AAS/SRT subtitles to videos.

If you are a Mac user, you can turn to iFastime Video Converter Ultimate for Mac for help which has the same function as the Windows version.

Free Download or Purchase iFastime Video Converter Ultimate:


Other Download: 


Step-by-step guide for converting all kinds of videos into Camtasia Studio

Step 1. Load files

Click "File>Add video/Audio" button to load the files like AVCHD which are needed to convert and import to Camtasia Studio. 


Step 2. Select the output format

Click "Format" button to select one Camtasia Studio supporting format. As mp4/h.264 (AVC) or WMV formats are the most supported video formats for Camtasia Studio, you are recommended to choose them as output format.


Tips:

1. Change the default destination by clicking "Browse" and selecting the right folder that will hold the converted videos.

2. If you want to personalize your videos, you can trim videos to get the wanted segments, crop the black bars, adjust video effects and insert (*.srt and *.ass, *.ssa) subtitles.

3.To get customized videos, you are able to click "Settings" button to adjust all the settings in the following window to customize the output file quality, including codec, size, bit rate, frame rate, sample rate and audio channel.


Step 3. Complete the conversion

Click "Start conversion" button to complete the video to Camtasia Studio conversion. You can the get the converted video by clicking “Open output folder” and then stream the video to Camtasia Studio for edit.


Now you may successfully edit your videos in Camtasia Studio without the aboving annoying problems.


Have more questions about how to import  all kinds of videos into Camtasia Studio, please feel free to contact us>> or leave a message at Facebook.


More reading:


Friday 8 April 2016

Work Phantom 4 4K Video with Sony Vegas Pro 13

Shooting amazing 4K movies with the DJI Phantom 4 and you wanna upload them to one of the most popular video editing software Sony Vegas Pro for editing. However, something let you down, and maybe a number of DJI Phantom 4 and Sony Vegas users have ever encoutered the similar problems :

“I'm starting to get some DJI Phantom 4 great 4k footage and want to be able to do some simple editing in Sony Vegas Pro 13 , when I try to upload the mp4 video taken from phantom, it doesn't do anything!! Do I need to change the file type from mp4 to something else? How do I do it peeps??

The Phantom 4 records 4K and full HD video in H.264/MPEG-4 AVC MP4 format wrapped in MOV container. The disappointing things is that Sony Vegas Pro cannot work with 4K files perfectly. Although the latest version Sony Vegas Pro 13 claims to support 4K video editing, but it is extremely hardware intensive. Besides, DJI Phantom 4 captured 4K videos in quite big file size, which will take a lot of time for Sony Vegas Pro to render those Phantom 4 4K videos.

If you want to import the DJI Phantom 4 4K videos to Sony Vegas Pro 13 for editing, you may need to convert DJI Phantom 4 4K MP4/MOV to Sony Vegas Pro more friendly format like MPEG-2. As MOV files are also well worked in Sony Vegas Pro, you have no need  to do this job, but for smooth editing workflows, you are required to downscale the 4K Phantom 4 videos to 2K resolutions.

Both operations above need a powerful third party software to help. iFastime Video Converter Ultimate (Mac) is now providing the most reliable and professional 4K solutions to DJI Phantom 4 4K videos and other 4K video issues including 4K XAVC/XAVC S, 4K MP4, 4K MTS, 4K MXF and more.

With this professional DJI Phantom 4 4K to Sony Vegas Pro video converter, you are allowed to import Phantom 4 4K videos into Sony Vegas Pro with the preset MPEG-2, WMV and MOV formats. What’s more, it can compress the resolution of DJI Phantom 4 4K footage from 4096*2160P to 1920*1080P so that you the video clips easier for Sony Vegas Pro to render or directly edit. 

In addition, the specialized video format is also provided for DJI Phantom 4 and other 4K videos to edit in other popular Windows editing software like Adobe Premiere ElementsWindows movie maker, FCP, Avid, iMovie and so on.(Read review)

Free Download or Purchase iFastime Video Converter Ultimate:


Other Download: 


Detail guidance for importing Phantom 4 4K Video files to Sony Vegas Pro 13

Step 1. Load Phantom 4 4K Videos

Click the button “File>Add Video/Audio” to add Phantom 4 4K Video files. You can also directly drag and drop your Phantom 4 4K Video files to the Converter. Simply select an item and click the “Play” button to view the videos from the Preview window. Take snapshoot for your satisfied scene.


Step 2. Choose output format for editing in Sony Vegas pro

From "Format" drop-down list, select "Adobe Premiere/Sony..."> "MPEG-2 (*.mpg)" format for editing with Sony Vegas Platinum 13. The other to options WMV (VC-1) (*.wmv) and MOV(AVC) (*mov) is also for your consideration.


Step 3. Adjust Phantom 4 4K Videos parameter

Click “settings” to adjust the output parameters, like resolution, bitrate, etc. Click the "Size" to choose "1920*1080" as putput video size. Don't forget the balance between video quality and size.


Step 4. Start converting Phantom 4 4K Videos to Sony Vegas Pro

Hit the "Start conversion" button to start Phantom 4 4K Videos to Sony Vegas Pro 13 conversion.  Once the conversion completes, you can click "Open output folder" button to get the generated MPEG-2 files for Sony Vegas Pro 13 easily.

The last thing you required to do is to transfer the converted Phantom 4 4K Videos from your PC to Sony Vegas Pro 13 for smoothly editing. 

Have more questions about how to work Phantom 4 4K Video with Sony Vegas Pro 13, please feel free to contact us>> or leave a message at Facebook.

More Topics:

Tuesday 5 April 2016

Transcode and Edit Phantom 4 4K Video with Adobe Premiere Elements 13/12

DJI Phantom 4 gives you the ability to capture DCI-spec 4K (4096 x 2160) at 24 or 25 fps and UHD 4K (3840 x 2160) at up to 30 fps in MP4 or MOV(up to 4096×2160 24 / 25p, 60 Mbps, with MPEG-4 AVC / H.264 codec) format. Most of you want to edit DJI Phantom 4 4K videos in Premiere Elements 12/13 or other video editing applications. However, the 4K videos which the DJI Phantom 4 professionally captured doesn’t work fine in Premiere Elements 12/13. Adobe Premiere Pro 13 do can handle 4K files but it has extremely strict request for computer configuration. An Intel Core i7 chip is required to support Phantom 4 4K videos. You'll also need to be running Windows 7 or later, with 2GB of RAM and 4GB of available disk space. Macs will need a 64-bit 2-GHz multicore Intel processor, 2GB of RAM and 4GB of hard disk space, running OS X v10.8 Mountain Lion or later. In addition, the DJI Phantom 4 4K video footage compressed with MPEG-4 AVC/H.264 will still have big file size, it will take a lot of time to import them into Premiere 13.

Wanna edit  Phantom 4 4K videos  in Premiere Elements 13/12 and how?

Don’t be annoyed. Actually, here is a easy way to make Phantom 4 4K videos edit in Premiere Elements 13/12. Along with the help from a powerful third-party software, you can realized this goal effortlessly. The most professional one I recommend to you is iFastime Video converter Ultimate for Mac. There are many 4K video converter in the market but few them can process at a fast speed compared to iFastime Video converter Ultimate for Mac. What’s more, this easy-to-use 4K video converter offers you optimized format for editing DJI Phantom 4 in other popular Mac editing software like four types of Apple ProRes for FCP, Apple InterMediate Codec for iMovie, DNxHD for Avid Media Composer. And if you are a Windows user, iFastime Video Converter Ultimate can provide you with  MPEG-2, WMV, MOV for Sony Vegas Pro, (Read review).
Besides, since the majority of editing work with Adobe Premiere Elements and other editing software is still being finished in 1080p, In order to edit/upload/import/play DJI Phantom 4 4K videos smoothly, you are suggested to downscale DJI Phantom 4 4K 4K video files to 1080p with iFastime Video Converter Ultimate.

Free Download or Purchase iFastime Video Converter Ultimate for Mac: 


Other Download: 


Four steps to convert  DJI Phantom 4 4K videos for editing in Adobe Premiere Elements 13/12

Follow the simple step-by-step guide below.

Step 1. Load DJI Phantom 4 4K Video

Install the DJI Phantom 4 4K video converter program on your PC and run it. Drag the 4K video clips to the software. Or you can also click "File>Add Video/Audio" button on the top of the main interface to import video to the program. You can add multiple video files to convert at one time.


Step 2. Decide Output Format

For the next step, you'll have to choose an output format for your Phantom 4 4K video file. Click the "Format" drop down list to select "Adobe Premiere/Sony Vegas” catalogue. The program has three already optimized the video settings for Adobe Premiere Elements:MOV(AVC)(*.mov), WMV(VC-1)(*.mov), MPEG-2(*.mpg). Here we recommend you choose MPEG-2 which is seamlessly fit Adobe Premiere Elements 13/12.


Step 3. Downsize original 4K resolution at 1080P

Click "Settings" button. You can adjust video and audio settings, including codec, aspect ratio, bit rate, frame rate, sample rate, and audio channel in the pop up “Profile Settings” window. Click ”Size(pix)”and choose 1920*1080. That is the exact 1080P. Also, if you wanna more smaller video size, 720P and other video resolution is supported too. Moreover, you have no needs to do some adjustment if you are using Adobe Premiere Elements 13 with the requested computer configuration.


Step 4. Start Phantom 4 4K video to Premiere Elements 13/12 conversion

Hit "Start conversion" button to let the DJI Phantom 4 4K conversion begin. When the conversion finished, check the generated video, you will certainly be satisfied with its final video quality. Now the video would be much easier for you to edit in Premiere Elements 13/12.

That's it. You're done! Now you can import and edit DJI Phantom 4 4K video files in Premeire Elements without any hassle.

Have more questions about how to edit Phantom 4 4K videos  in Premiere Elements 13/12, please feel free to contact us>> or leave a message at Facebook.

Related Articles: