Windows Movie Maker is the best free video editing software which could help you freely edit and create movies. However when we attempt to load a MTS file, Movie Maker immediately crash and displays the error "Movie Maker Transcoder has stopped working", followed by "A problem caused the program to stop working correctly. Windows will close the program and notify you if a solution is available." Obviously Windows Media Player doesn't recognize the MTS file.
Official website states that Windows Movie Maker usually support media formats includes WMV, AVI, ASF, MPG, etc. Based on users` feedback, WMV is the best format for Windows Movie Maker. Then how to open MTS in Windows Movie Maker for editing? I have done a bit of research and testing, and have come up with a couple of methods to prepare .mts video for use with Windows Movie Maker. These methods are sound, and I have successfully converted, imported and editing .mts files using the steps below.
Solution 1: Apply Windows Movie Maker MTS codec pack
MTS codecs is necessary when encoding and decoding MTS files. Usually, with MTS codec pack installed in your computer, editing MTS files will not be stymied anymore. Below are two popular MTS codec packs that you can choose.
FFDShow MPEG-4 codec: It is a free download. Once you have installed it (you should be able to just click OK, OK, etc., until it is finished installing), try playing your .mts file in Windows Media Player. If you can play it, then you should be able to import and edit the .mts file in Windows Live Movie Maker.
XviD Codec: The free video codec that is strong in compression and quality. While Xvid compresses video very well, it can do so without causing visible quality loss and by retaining a sharper picture than other codecs do. Xvid is "lossy" compression but aims at removing just those picture details that are not important for human perception. As such, it be seen as a MP3 for video.
Tips: According to users’ feedback, don't install codecs adhoc or codec packs, they often cause more trouble than they solve.
Solution 2: Download and install Handbrake
It is a free and absolute favorite program for converting pretty much anything to a nice .mp4 video file. Open Handbrake.
1. Click on Source>Video File, and navigate to the .mts file you want to convert. Because of the size of these high definition files, it may take a couple of moments to pull the video into the program.
2. Because of the size of the original file, you will want to adjust a couple of settings to create a smaller file for editing. Do not worry - the video will still be plenty large enough for projecting on to a screen or putting on a DVD.
3. When you first pull a video into Handbrake, it automatically set the output file to reflect the resolution of the high
definition file.

4. Click the dropdown menu for Anamorphic to reflect None. Change width to 720, and check Keep Aspect Ratio. The Height setting will automatically change to 400. This means that the video will retain the proper 16:9 ratio without having black bars at the top, bottom and sides.

5. Set your destination to reflect where you want your finished .mp4 video to be saved. I chose to save to the default
Videos folder under Libraries.

6. Click Start to begin the encoding process. Handbrake will have a progress bar across the bottom of its window to let you see how things are progressing. While the current video is processing, you can actually click on Source, and import another .mts file, and click Add to Queue. It will then place the new file as next in line to process. You can add multiple files – I’ve added up to 12 different files for processing on other projects I have done.
You have the ability to minimize the Handbrake window so you can work on other things while it processes your file. You can also click on Show Queue to see the progress of all the files you are converting.

7. Once your file has been converted to .mp4, you can then import it into Windows Live Movie Maker. Since you are
working with a widescreen (16:9) file, be to go under the Project tab in Movie Maker, and select 16:9 for the aspect
ratio.
The better easy workaround is to transcode the MTS to a format that Windows Movie Maker natively supports.iFastime Video Converter Ultimate is a professional video converter, which can convert MTS to AVI, MOV, WMV, MP4, MPG, etc. and convert 3D MTS to any file format that compatible with Windows Movie Maker. It Supports Windows 10/8.1/8/7/Vista/XP. No extra tools are required, the original quality of AVCHD MTS files will be kept. The following tutorial will detail you how to to convert MTS to Windows Movie Maker friendly file type.
Free Download or Purchase iFastime Video Converter Ultimate:
Other Download:
- Cnet Download: http://download.cnet.com/iFastime-Video-Converter-Ultimate/3000-2194_4-76449859.html
- Top 4 Download: http://www.top4download.com/ifastime-video-converter-ultimate/chjkfujg.html
- Free Downloads Center:http://www.freedownloadscenter.com/Multimedia_and_Graphics/Misc__Sound_Tools/iFastime_Video_Converter_Ultimate.html
- Softonic Download: http://ifastime-video-converter-ultimate.en.softonic.com/
- WinSite Download: http://www.winsite.com/Multimedia/Video/iFastime-Video-Converter-Ultimate/
How to convert MTS to Windows Movie Maker supported format?
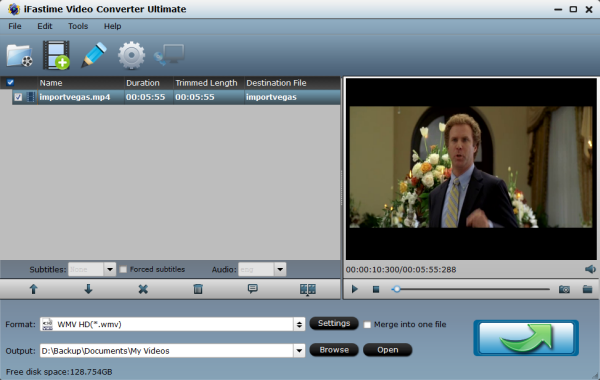
Step 1: Import MTS files to the program
After installing the video converter, launch it and click “Add Video” button to import the MTS files.

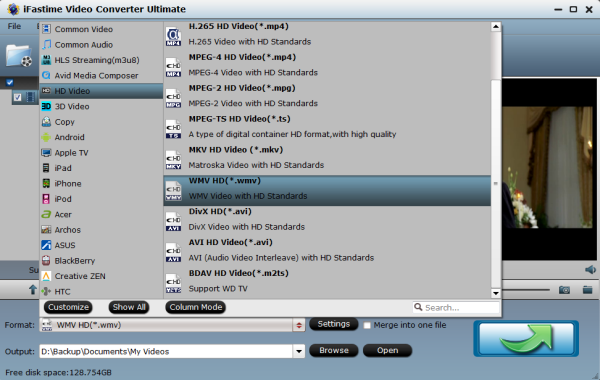
Step 2: Select the output format
Hit the "Format" box and select "HD Video" > "WMV HD(*.wmv)" on the dropdown menu as output format. Besides, you can also choose “AVI HD Video(*.avi)” as output if you have not installed the .wmv codec.

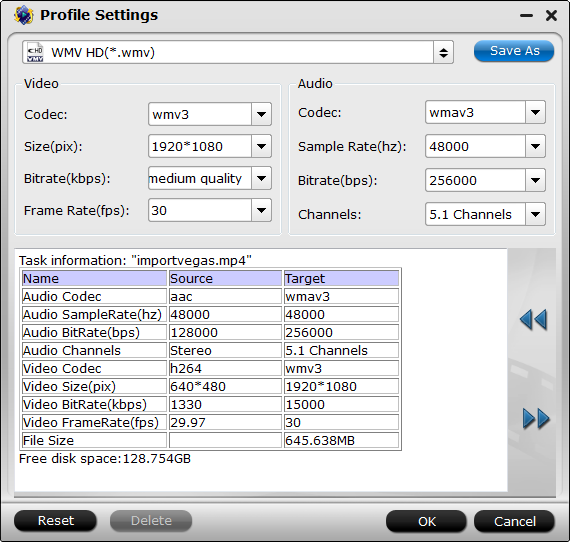
Tips: Determine video resolution, bit rate, frame rate, etc.
Click "Settings" button, then you will be able to adjust audio and video parameters on the popup window to customize the output file quality, these adjustable parameters include codec, bit rate, frame rate, sample rate, and audio channel. You’re advised to adjust the A/V parameters to be the same with source MTS files so as to bear least quality loss at proper file size.

Step 3: Start converting MTS to Windows Movie Maker
Click the “Start conversion” button, the AVCHD MTS converter will start encoding AVCHD .mts for importing to Windows (Live) Movie Maker.
Once the conversion is finished you can click "Open" button to get the output files effortlessly, and now you are ready to import and edit MTS files with Windows Movie Maker. Just import the converted files to WMM for editing via its "Import video" option.
Have more questions about how to ..., please feel free to contact us>> or leave a message at Facebook.
More Topics:
Step 1: Import MTS files to the program
After installing the video converter, launch it and click “Add Video” button to import the MTS files.

Step 2: Select the output format
Hit the "Format" box and select "HD Video" > "WMV HD(*.wmv)" on the dropdown menu as output format. Besides, you can also choose “AVI HD Video(*.avi)” as output if you have not installed the .wmv codec.

Tips: Determine video resolution, bit rate, frame rate, etc.
Click "Settings" button, then you will be able to adjust audio and video parameters on the popup window to customize the output file quality, these adjustable parameters include codec, bit rate, frame rate, sample rate, and audio channel. You’re advised to adjust the A/V parameters to be the same with source MTS files so as to bear least quality loss at proper file size.

Step 3: Start converting MTS to Windows Movie Maker
Click the “Start conversion” button, the AVCHD MTS converter will start encoding AVCHD .mts for importing to Windows (Live) Movie Maker.
Once the conversion is finished you can click "Open" button to get the output files effortlessly, and now you are ready to import and edit MTS files with Windows Movie Maker. Just import the converted files to WMM for editing via its "Import video" option.
Have more questions about how to ..., please feel free to contact us>> or leave a message at Facebook.
More Topics:


No comments:
Post a Comment