Showing posts with label MTS. Show all posts

Monday 16 November 2015

Enocde MTS/MXF/MP4/XAVC/MOV to ProRes on Windows

Need ProRes on Windows:

"I've just finished editing a movie on Premiere Pro CS5 (Windows version). And now, I'm planning to use Davinci Resolve for color grading. The problem is I have to convert my files to ProRess 422 HQ to work on this software. As you know it, this codec is only available for Mac users only (which I'm not). How can I convert my files to ProRes 422 (HQ) and then modify my Premiere Pro project with my new ProRes 422 (HQ) files?"

Apple ProRes is a codec technology developed for high-quality, high-performance editing in Final Cut Pro X. Apple has licensed Apple ProRes to select companies for use in specific products and workflows. We know Apple's ProRes family is basically used on Mac OS X, not for Windows. But like the user above mentioned,  there are many users are eager to convert videos to ProRes on Windows PC for different demands. Here we'd like to recommend you an excellent Apple ProRes Converter for Windows. Get it now.

Best Apple ProRes Converter for Windows:

iFastime Video Converter Ultimate is one of top video conveter you can encode various files to Apple ProRes on the Windows platform. As a professional ProRes converter, it supports converting MTS, AVI, WMV, MKV, FLV, MXF, MP4, VOB, XAVC(S), etc. video files to all variants of ProRes: ProRes 422, Prores 422 LT, ProRes 422 HQ and ProRes 422 Proxy. Besides ProRes, it also provides professional encoders- DNxHD, MPEG-2, etc, ensuring maximum editing quality and efficiency when working with Davinci Resolve, Adobe Premiere on Windows PC. Below is a tutorial on how to encode your videos in the ProRes 422 format. Read review to learn more.

Plus: if you are a Mac user, just get iFastime Video Converter Ultimate for Mac

Free Download or Purchase iFastime Video Converter Ultimate:


Other Download: 
How to enocde MTS/MXF/MP4/XAVC/MOV to ProRes on Windows

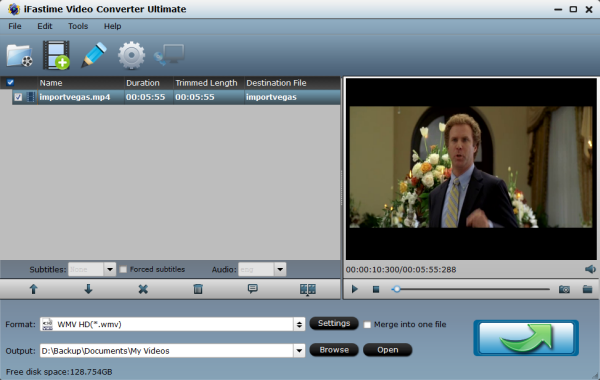
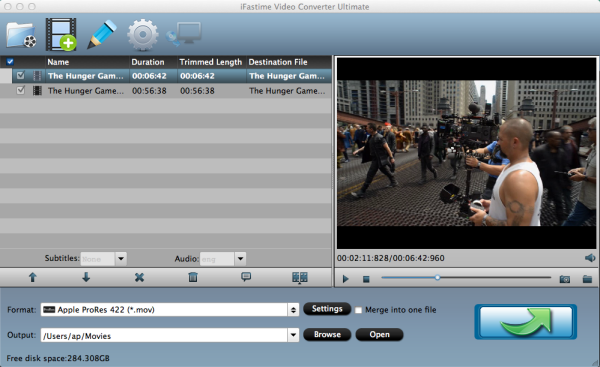
STEP 1. Run the ProRes Windows Converter you have downloaded; click "Add video" icon to load your source video files. Or you can directly drag&drop videos into program.


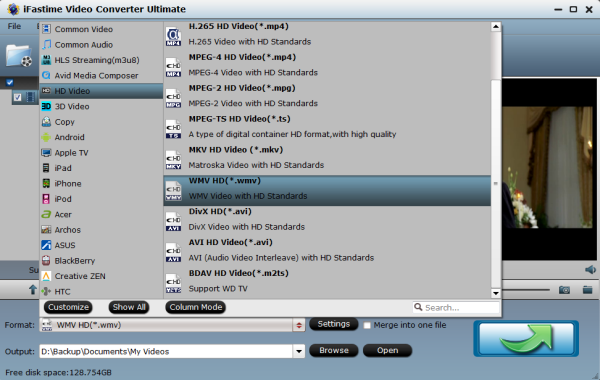
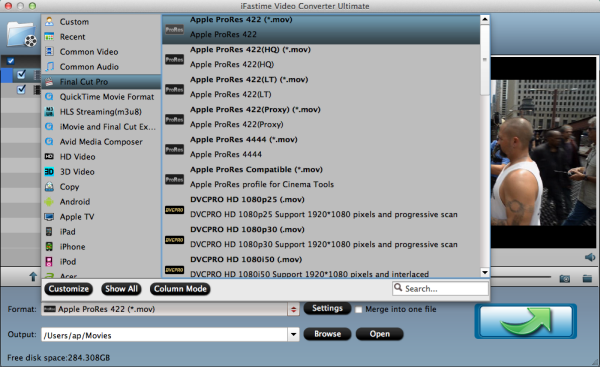
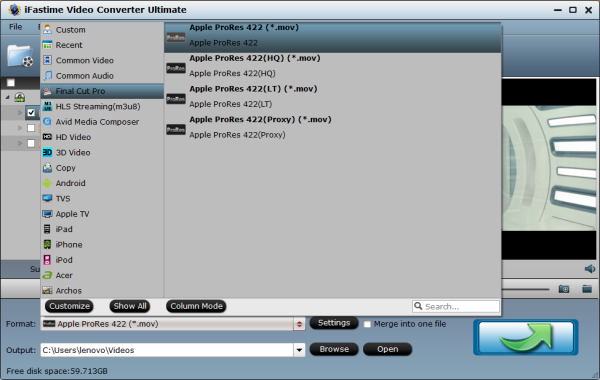
STEP 2. Go to "Format" bar and choose "Final Cut Pro > Apple ProRes 422 (*.mov)" as output format .


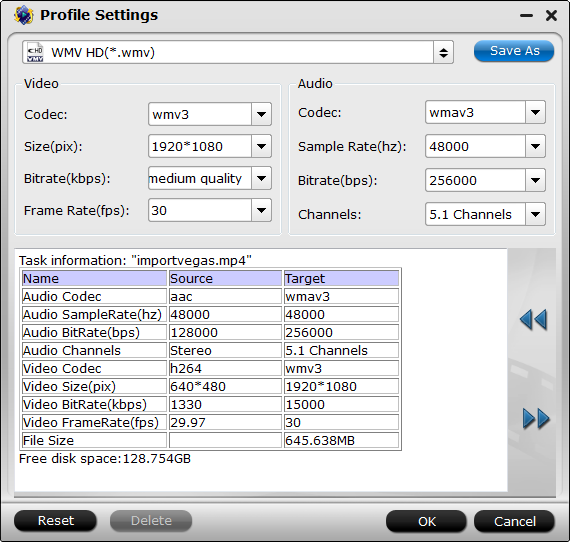
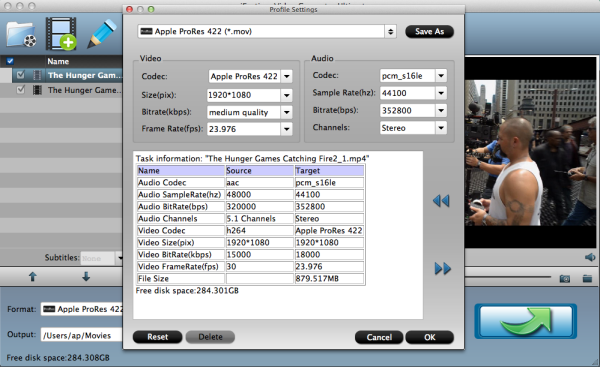
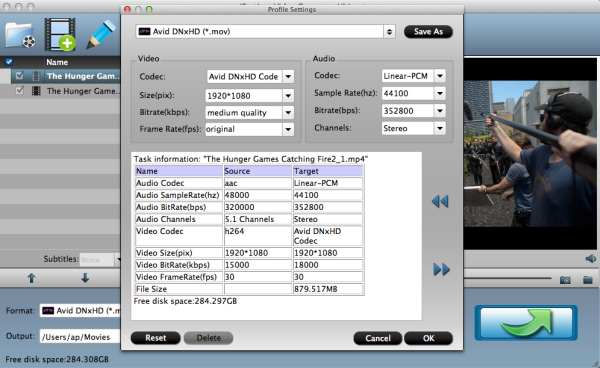
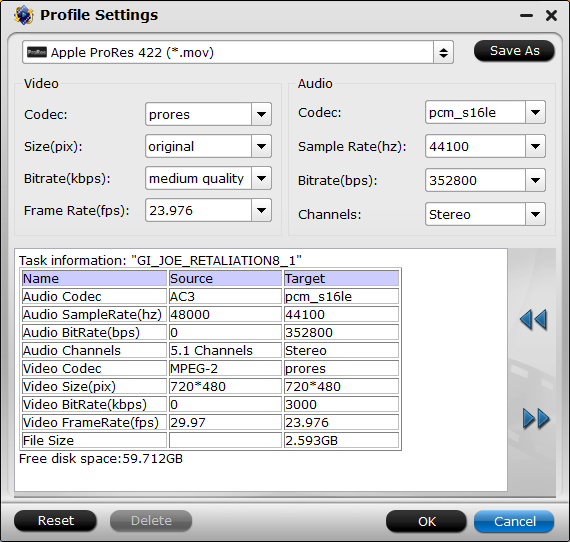
STEP 3. If you'd like to customize advanced audio and video parameters like Video Codec, aspect ratio, bit rate, frame rate, Audio codec, sample rate, audio channels, please turn to "Settings" page.


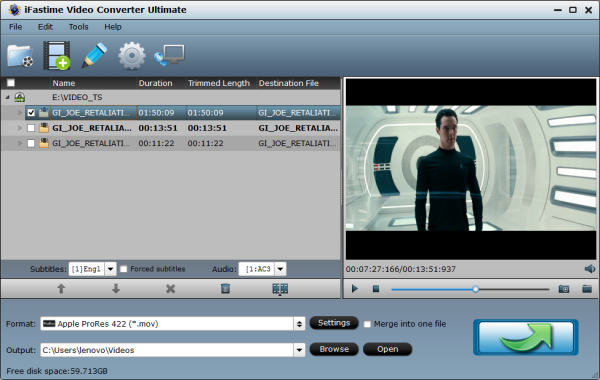
STEP 4. Tap the “Start conversion” button; it will start converting MTS/MXF/MP4/XAVC/MOV to ProRes .mov for importing to Davinci Resolve instantly. After conversion, just get the generated ProRes files for natively editing in Davinci Resolve via "Open" panel. Now you can edit MTS/MXF/MP4/XAVC/MOV videos in Davinci Resolve, FCP and other NLES on Windows without any problem.

Have more questions about how to enocde MTS/MXF/MP4/XAVC/MOV to ProRes on Windows, please feel free to contact us>> or leave a message at Facebook.

More Topics:

Thursday 12 November 2015

Solve "Windows Movie Maker Can't Import MTS"

Windows Movie Maker is the best free video editing software which could help you freely edit and create movies. However when we attempt to load a MTS file, Movie Maker immediately crash and displays the error "Movie Maker Transcoder has stopped working", followed by "A problem caused the program to stop working correctly. Windows will close the program and notify you if a solution is available." Obviously Windows Media Player doesn't recognize the MTS file.  

Official website states that Windows Movie Maker usually support media formats includes WMV, AVI, ASF, MPG, etc. Based on users` feedback, WMV is the best format for Windows Movie Maker. Then how to open MTS in Windows Movie Maker for editing? I have done a bit of research and testing, and have come up with a couple of methods to prepare .mts video for use with Windows Movie Maker. These methods are sound, and I have successfully converted, imported and editing .mts files using the steps below. 

Solution 1: Apply Windows Movie Maker MTS codec pack

MTS codecs is necessary when encoding and decoding MTS files. Usually, with MTS codec pack installed in your computer, editing MTS files will not be stymied anymore. Below are two popular MTS codec packs that you can choose.

FFDShow MPEG-4 codec: It is a free download. Once you have installed it (you should be able to just click OK, OK, etc., until it is finished installing), try playing your .mts file in Windows Media Player. If you can play it, then you should be able to import and edit the .mts file in Windows Live Movie Maker. 

XviD Codec: The free video codec that is strong in compression and quality. While Xvid compresses video very well, it can do so without causing visible quality loss and by retaining a sharper picture than other codecs do. Xvid is "lossy" compression but aims at removing just those picture details that are not important for human perception. As such, it be seen as a MP3 for video.
Tips: According to users’ feedback, don't install codecs adhoc or codec packs, they often cause more trouble than they solve.

Solution 2: Download and install Handbrake

It is a free and absolute favorite program for converting pretty much anything to a nice .mp4 video file. Open Handbrake. 
1. Click on Source>Video File, and navigate to the .mts file you want to convert. Because of the size of these high definition files, it may take a couple of moments to pull the video into the program. 
2. Because of the size of the original file, you will want to adjust a couple of settings to create a smaller file for editing. Do not worry - the video will still be plenty large enough for projecting on to a screen or putting on a DVD. 
3. When you first pull a video into Handbrake, it automatically set the output file to reflect the resolution of the high 
definition file. 


4. Click the dropdown menu for Anamorphic to reflect None. Change width to 720, and check Keep Aspect Ratio. The Height setting will automatically change to 400. This means that the video will retain the proper 16:9 ratio without having black bars at the top, bottom and sides. 


5. Set your destination to reflect where you want your finished .mp4 video to be saved. I chose to save to the default
Videos folder under Libraries. 


6. Click Start to begin the encoding process. Handbrake will have a progress bar across the bottom of its window to let you see how things are progressing. While the current video is processing, you can actually click on Source, and import another .mts file, and click Add to Queue. It will then place the new file as next in line to process. You can add multiple files – I’ve added up to 12 different files for processing on other projects I have done. 
You have the ability to minimize the Handbrake window so you can work on other things while it processes your file. You can also click on Show Queue to see the progress of all the files you are converting. 


7. Once your file has been converted to .mp4, you can then import it into Windows Live Movie Maker. Since you are 
working with a widescreen (16:9) file, be to go under the Project tab in Movie Maker, and select 16:9 for the aspect 
ratio. 

Solution 3: 

The better easy workaround is to transcode the MTS to a format that Windows Movie Maker natively supports.iFastime Video Converter Ultimate is a professional video converter, which can convert MTS to AVI, MOV, WMV, MP4, MPG, etc. and convert 3D MTS to any file format that compatible with Windows Movie Maker. It Supports Windows 10/8.1/8/7/Vista/XP. No extra tools are required, the original quality of AVCHD MTS files will be kept. The following tutorial will detail you how to to convert MTS to Windows Movie Maker friendly file type.

Free Download or Purchase iFastime Video Converter Ultimate:


Other Download: 
How to convert MTS to Windows Movie Maker supported format?

Step 1: Import MTS files to the program
After installing the video converter, launch it and click “Add Video” button to import the MTS files.


Step 2: Select the output format
Hit the "Format" box and select "HD Video" > "WMV HD(*.wmv)" on the dropdown menu as output format. Besides, you can also choose “AVI HD Video(*.avi)” as output if you have not installed the .wmv codec.


Tips: Determine video resolution, bit rate, frame rate, etc.
Click "Settings" button, then you will be able to adjust audio and video parameters on the popup window to customize the output file quality, these adjustable parameters include codec, bit rate, frame rate, sample rate, and audio channel. You’re advised to adjust the A/V parameters to be the same with source MTS files so as to bear least quality loss at proper file size.


Step 3: Start converting MTS to Windows Movie Maker
Click the “Start conversion” button, the AVCHD MTS converter will start encoding AVCHD .mts for importing to Windows (Live) Movie Maker.

Once the conversion is finished you can click "Open" button to get the output files effortlessly, and now you are ready to import and edit MTS files with Windows Movie Maker. Just import the converted files to WMM for editing via its "Import video" option.

Have more questions about how to ..., please feel free to contact us>> or leave a message at Facebook.

More Topics:

Wednesday 11 November 2015

Load 3D MTS in Avid Media Composer for editing

With the development of technology, 3D effect has been adopted to camcorders. Now, many prosumer users can purchase stereoscopic 3D cameras at decent prices, such as Sony TD10, DEV-5, Sony DSC-WX30, JVC GY-HMZ1U, Panasonic AG-3DA1 or other 3D camcorders. They often face the frustrating issue like 3D MTS recordings and Avid Media Composer incompatibility. 

3D MTS is created by stereoscopic video (AVCHD 3D), the new video modes require double the data rate of previous modes, and Avid Media Composer supports AVCHD natively with the default plug-in (only in the MOV wrapper). It means that we cannot load MTS into Avid directly, for 3D MTS not in MOV wrappers. If we wanna solve this problem, you’ll need to download the specific plug-in here. 

However, to download the plug-in will create more unnecessary AD, and the quality of MTS files are not guaranteed. In order to avoid the loss of importing quality, the better solution is to get the 3D MTS files compatible with Avid MC by using a professional 3D MTS Converter. 

I`d recommend you to use iFastime Video Converter Ultimate for Mac, which can help you to convert 3D MTS files to Avid optimum compatible formats with DNxHD(*.mov.). What's more, it can make 3D movies from both 2D or 3Desources to watch on 3D media players, TV, game consoles or mobile phone with side by Side by Side, Red/Blue and Top/Bottom 3D effects for Mac OS X El Capitan. The contents below will tell you how to import 3D MTS to Avid for Mac.Read review to learn more function.

Free Download or Purchase iFastime Video Converter Ultimate for Mac:


Other Download: 
How to transcode 3D MTS to Avid Media Composer for Mac OS X El Capitan?

Step 1: Launch and run the Mac 3D MTS Converter, click the "Add video" button on the top of the main interface to load source videos to the software.


Step 2. Click the format bar or the pull down menu of “Format” to select output format. To edit your videos in Avid Media Composer, then just choose Avid Media Composer > Avid DNxHD(*.mov) as an output format.


Tip: In case the default settings do not fit your requirement, you can click "Settings" button and enter "Profile Settings" panel to adjust video size, bit rate, frame rate, sample rate and audio channels.


Step 3. Finally, click the "Start conversion" button to convert 3D MTS to Avid friendly formats on your Mac OS X El Capitan.

After the conversion process bar at 100%, you can click the "Open" icon to locate the output DNxHD files. Now importing converted 3D MTS files to Avid Media composer for editing becomes simple and smooth.

Have more questions about how to work with 3D MTS in Avid Media composer for Mac OS X El Capitan, please feel free to contact us>> or leave a message at Facebook.

More Topics:

Tuesday 10 November 2015

How to solve MTS not recognized in FCP X on Mac OS X El Capitan

When we wanna edit and get camcorder MTS files to share the interesting movie to YouTube, we may consider Final Cut Pro. Yes, it is an ideal app to edit videos. However you may find that MTS files cannot directly be imported into FCP X for Mac.

FCP X claims Native AVCHD Support, the real meaning is Final Cut Pro X will still not import a stand-alone AVCHD video file, and importing AVCHD still requires access to the original AVCHD camcorder, or a valid Camera Archive disk structure. As we know Final Cut Pro X has a highly reliable camera import feature that supports AVCHD files, you must import MTS files directly from the camera, from a memory card (with the original file structure in place), or from a camera archive. That to say Final Cut Pro X fully supports AVCHD, but it is not possible to import single MTS files.

This is a pain for many people who just import single MTS file. Is any possibility for us to solve these problems? Yes, you need to convert them to FCP more friendly formats before you try to import MTS to FCP X. I`d recommend you to use iFastime Video Converter Ultimate for Mac, a professional video converter, it can help convert MTS to Prores codec like Apple ProRes 4444 XQ, Apple ProRes 4444, Apple ProRes 422 HQ, Apple ProRes 422, Apple ProRes 422 LT,  Apple ProRes 422 Proxy that FCP X recognizes. With the built-in editor, you can trim or crop your videos, add subtitles and watermarks to the videos as well.

Note: If you are using FCP X, please make sure you have installed ProApps QuickTime Codecs. After installation, you can follow these steps to transcode MTS file to Prores for FCP X.

Free Download or Purchase iFastime Video Converter Ultimate for Mac:


Other Download: 
Workflow to transcode and import MTS files to FCPX for Mac El Capitan

Step 1: Add MTS video files

First of all, download MTS file converter on Mac and then launch it. Connect your AVCHD camcorder to Mac, copy the MTS files to your hard disk, and then import .mts files. You can directly drag and drop video clips to file converter. You can also batch conversion at one time.


Step 2. Select an output video format 

You can choose FCP X friendly format, or directly choose "Final Cut Pro Apple ProRes 422 (*.mov)" as the output format.


Tip: In case the default settings do not fit your requirement, you can click "Settings" button and enter "Profile Settings" panel to adjust video size, bit rate, frame rate, sample rate and audio channels.


Step 3. Finally, click the "Start conversion" button to convert MTS to FCP friendly formats on your Mac El Capitan.

After conversion is complete, click “Open” you can import converted MTS files to FCPX for further editing without problem. Then share the funny movie or video to YouTube with friends. 

Note: This MTS Video Converter for Mac Supports MTS files from a variety of HD camcorders like: Canon VIXIA HF200, Canon FS200, Canon VIXIA HFS100, Canon VIXIA HG21, Panasonic HDC-HS300, Panasonic HDC-HS20, Sony HDR-CX100, Sony DCR-SR47, JVC GZ-HD40, JVC GZ-HD10 etc.

Have more questions about how to work with MTS in FCP X, please feel free to contact us>> or leave a message at Facebook.

More Topics:

Monday 9 November 2015

Edit MTS in DaVinci Resolve on Mac OS X El Capitan

MTS footage won't work in DaVinci Resolve:

“I have a camera with my masterpiece, but today something unhappy happen.The camera can’t import MTS into DaVinci Resolve on Mac OS X El Capitan. It hints that the format is wrong.”

In practical terms, many people are facing the MTS importing issues with DaVinci Resolve. DaVinci Resolve can support the formats include CinemaDNG, DPX, CIN, QuickTime, DNxHD and native RAW files, MTS is not in the format list, So we need MTS converter to encode MTS files to get the format of DNxHD.

iFastime Video Converter Ultimate is a perfect choice. It can convert not only MTS but also MP4, MKV, MXF, AVI, MP4, and FLV to Avid DNxHD MOV into DaVinci Resolve on Mac OS X El Capitan at a high rate of speed and save much time for importing to DaVinci Resolve. This Video Converter can also help to trim the video to remove the unwanted segments. Read review to learn more.

How do we need to do? Generally, we import MTS files into the converter, then it can help us to convert into DNxHD that we need. You can learn the specific steps as follows.

Free Download or Purchase iFastime Video Converter Ultimate for Mac:


Other Download: 
Workflow for importing MTS to DaVinci Resolve(Lite) on Mac OS X El Capitan:

1. Install and launch the MTS file converter, and then click “Add video”to import .mts files.


2. Hit Format bar to select output format. You can choose Avid Media Composer > Avid DNxHD(*.mov) as output format. It is an ideal editing format for Resolve. 


Tip: In case the default settings do not fit your requirement, you can click "Settings" button and enter "Profile Settings" panel to adjust video size, bit rate, frame rate, sample rate and audio channels.


3. Click "Start conversion" button to start transcoding MTS to DNxHD for DaVinci Resolve immediately 

Now computer desktop appears DNxHD file, drag the file needed into DaVinci Resolve.   

You can import either file-based codecs or capture via camera directly. Since the latter option has both feet in the grave, I’ll ignore it. To import file-based codecs:
  • Find the file in the Library panel.
  • Double click your clip or Right-click and select ‘Add into Media Pool.’
  • The clip is added to your Media Pool.
  • You can also import entire directors or a range of clips into the Media Pool.


Now you can edit MTS in DaVinci Resolve on Mac OS X E1 Capitan. Wish you to have good time. 

Have more questions about how to work with MTS in DaVinci Resolve Lite, please feel free to contact us>> or leave a message at Facebook.

More Topics: