Problems with import videos to Camtasia Studio for edit
1."Hello, I recorded some videos on my sony HD camera and wanted to cut together a highlight video using Camtasia 8.0. The camera saved the files as *.m2ts which Camtasia doesn't seem to be able to read. There is an option to convert the M2TS to WMV or MPEG-2. Now I can import the *.wmv media but it only saves in 640x480 instead of 1080i which is what I want. The MPEG-2 is the file that gets the codec Error. Is there anything I can do to get the M2TS video file worked with Camtasia or are they just both incompatible?"
2.I just updated from Camtasia 7 to Camtasia 8. I could import .mov files with Camtasia 7. Now Camtasia 8 will import .mov files but not read them and stop and start not to respond in front of a .mov file. Can you help? I regret this update. I am greatly frustrated.......
3.Hello techsmith staffs! i'm having a problem on importing video files. I just wonder why can't I import .avi files on camtasia. I can only import .mpg. can you please attend to my concern? I badly need your solution right now. Its for our project. Thank you!
Why such format issues happen to you?
Like many other video editing programs, Camtasia have restriction for video and audio formats, It means that those videos incompatible cannot be imported to Camtasia Studio directly.
Camtasia supports AVI, .WMV, MPEG-1, .MP3, .WAV, .WMA, and .MOV (QuickTime) files. It does not support AVCHD files (.m2ts, .mts, and .m2t), Video_TS, MPEG-2, MOD, Ogg, WebM, .RM (RealPlayer), .FLV (Flash Video), 3GPP, and SWF created outside Techsmith products.
However, as the problems listed above, although some video formats like MOV, AVI claimed to be supported by Camtasia Studio, we may still encounter video won’t be edit by it issue. This is because MOV, AVI and other video formats are just containers, each format will have different codecs.
In a word, due to the Camtasia Studio video restriction and format issues, M2TS, MOV, AVI and other formats cannot be imported to Camtasia Studio for editing.
How to Import all kinds of Videos into Camtasia Studio
For the video format that supported by Camtasia Studio, you can directly transfer them through USB or other wireless method from your computer or ohter portable devices. But for the unsupported formats, you can choose to render videos with Camtasia Studio, but generally speaking, it will take you a lot of time to wait for the render conplete, and not all the video formats can be renderred successfully. Then you have a third choice: convert unsupported formats with a third party software then imported to Camtasia Studio.
Here we recommend iFastime Video Converter Ultimate which has strong ability to convert all kinds of videos to Camtasia Studios. This powerful video converter can also convert all kinds of videos to other editindg software and devices like Sony Vegas Pro, Windows Movie Maker, Pinnacle Studio, PowerDirector, iPhone 7/SE/6s/6, iPad Mini (2/3/4), iPad Air (2/3), iPad Pro, etc. In addition, it is also a video editing and creating software. It will help you cut off videos to create clips, crop/expand video edges, merge multiple video files to cut together a highlight video, and even add external AAS/SRT subtitles to videos.
If you are a Mac user, you can turn to iFastime Video Converter Ultimate for Mac for help which has the same function as the Windows version.
Free Download or Purchase iFastime Video Converter Ultimate:


Other Download:
- Cnet Download: http://download.cnet.com/iFastime-Video-Converter-Ultimate/3000-2194_4-76449859.html
- Top 4 Download: http://www.top4download.com/ifastime-video-converter-ultimate/chjkfujg.html
- Free Downloads Center:http://www.freedownloadscenter.com/Multimedia_and_Graphics/Misc__Sound_Tools/iFastime_Video_Converter_Ultimate.html
- Softonic Download: http://ifastime-video-converter-ultimate.en.softonic.com/
- WinSite Download: http://www.winsite.com/Multimedia/Video/iFastime-Video-Converter-Ultimate/
Step-by-step guide for converting all kinds of videos into Camtasia Studio
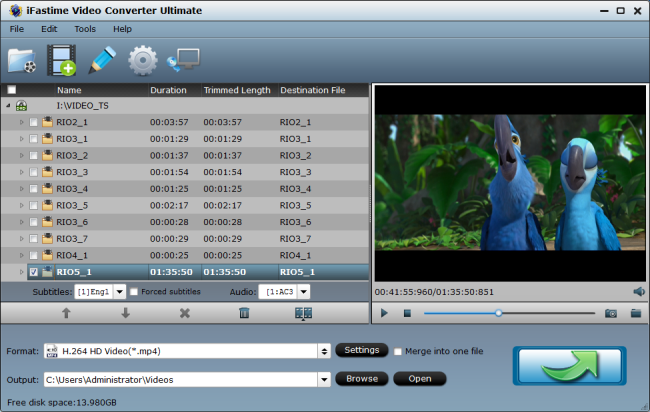
Step 1. Load files
Click "File>Add video/Audio" button to load the files like AVCHD which are needed to convert and import to Camtasia Studio.
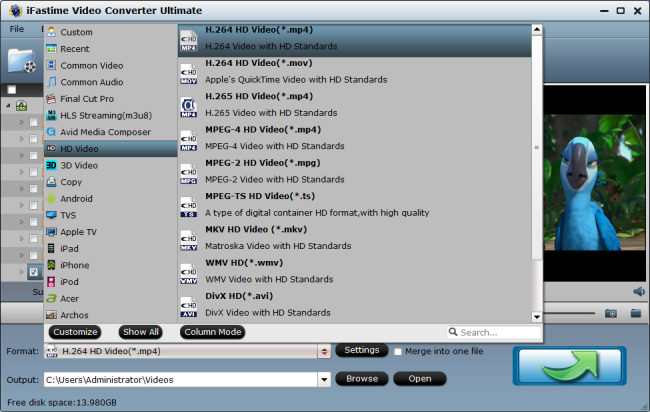
Step 2. Select the output format
Click "Format" button to select one Camtasia Studio supporting format. As mp4/h.264 (AVC) or WMV formats are the most supported video formats for Camtasia Studio, you are recommended to choose them as output format.
Tips:
1. Change the default destination by clicking "Browse" and selecting the right folder that will hold the converted videos.
2. If you want to personalize your videos, you can trim videos to get the wanted segments, crop the black bars, adjust video effects and insert (*.srt and *.ass, *.ssa) subtitles.
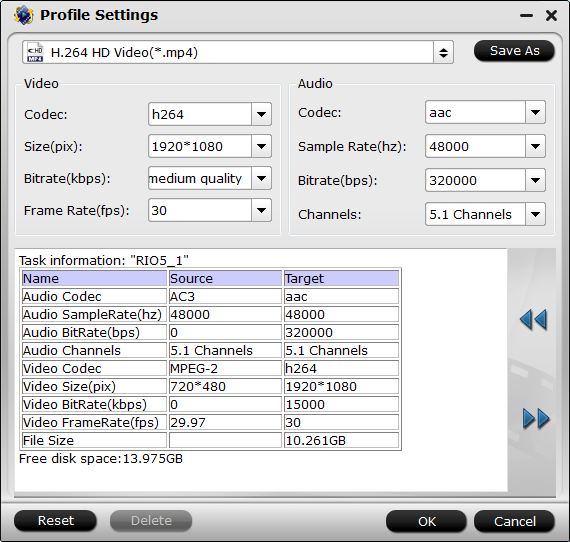
3.To get customized videos, you are able to click "Settings" button to adjust all the settings in the following window to customize the output file quality, including codec, size, bit rate, frame rate, sample rate and audio channel.
Step 3. Complete the conversion
Click "Start conversion" button to complete the video to Camtasia Studio conversion. You can the get the converted video by clicking “Open output folder” and then stream the video to Camtasia Studio for edit.
Now you may successfully edit your videos in Camtasia Studio without the aboving annoying problems.
Have more questions about how to import all kinds of videos into Camtasia Studio, please feel free to contact us>> or leave a message at Facebook.
More reading:
No comments:
Post a Comment