GoPro HD is the world's first true HD and best selling wearable camera to record sporting and other activities. The latest GoPro Hero4 Black allows you to record at up to 4K resolution at 30 frames per second.The new GoPro Hero4 Session is a considerably more compact action camera than previous models GoPro Hero4 Black, Hero 4 Silver. It is a great enjoyment to edit them in editing software like DaVinci Resolve.Well, as the previous mode, the GoPro Hero4 still records videos in H.264 codec, .mp4 file format. Something turns to be frustrated; the H.264 MP4 footages from GoPro Hero4 Session are not accepted by DaVinci Resolve. Keep reading for a brief how-to on the simple process, which guaranteed to import your GoPro Hero4 Session 4K MP4 to DaVinci Resolve for smoothly editing.To change GoPro Hero4 4K MP4 files, you can adopt iFastime Video Converter Ultimate for Mac to get help. It is a professional yet easy-to-use tool to help you finish the 4K MP4 to Davinci Resolve conversion on Mac. Besides, this powerful converter also has the ability to encode 4K videos to iMovie, Avid Media Composer, FCP, FCE, Premiere Pro CC/CS6/CS5, and more. Free Download or Purchase iFastime Video Converter Ultimate for Mac:
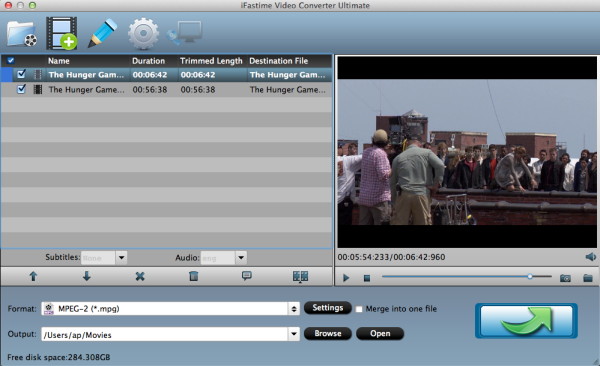
 Other Download:Cnet Download: http://download.cnet.com/iFastime-Video-Converter-Ultimate/3000-2194_4-76449859.htmlSoftonic Download: http://ifastime-video-converter-ultimate-for-mac.en.softonic.com/macDownload Collection: http://www.downloadcollection.com/ifastime_video_converter_ultimate_for_mac.htmGuide on how to make GoPro Hero4 4K MP4 video reable by Davinci ResolveStep 1: Load GoPro Hero4 4K videosLaunch the iFastime Video Converter Ultimate for Mac, and you may either click "Add video" button to import 4k .mp4 files, or directly drag and drop the files into this program. If you'd like to combine multiple GoPro Hero4 4K files to be a single file, you can tick the checkbox "Merge into one file".
 Step 2: Select Resolve readable formatClick the "Format" to select output format. Choose "Avid Media Compose > Avid DNxHD(*.mov)" as the output format.
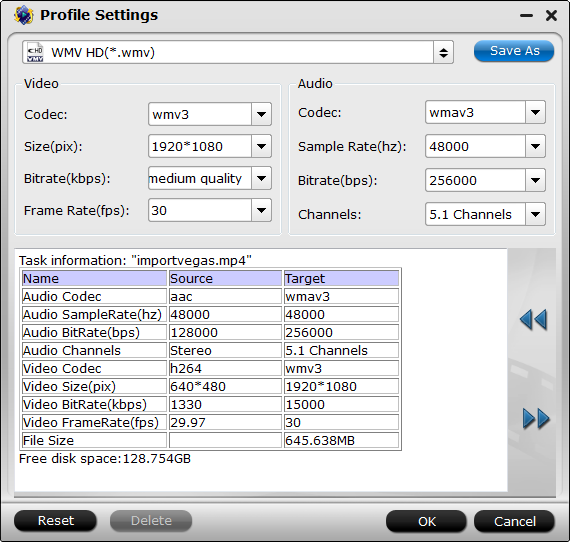
 Tip: Before conversion, you can click the "Settings" icon to customize the video/audio settings including the Bitrate of Video and Audio, Audio, Video Size, Sample Rate, Frame Rate, Audio Channels, etc.
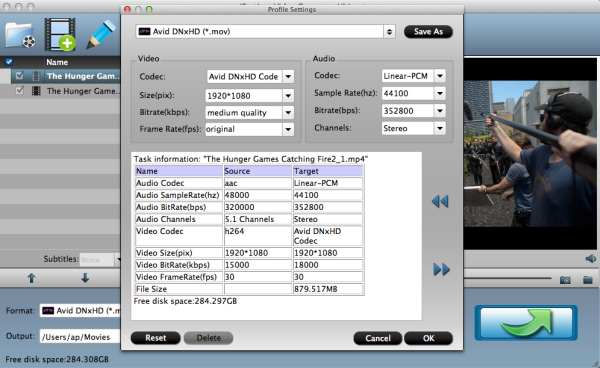 Step 3: Converting GoPro Hero4 4K MP4 video files to Davinci ResolveAfter all the necessary setting have been done, click the "Start conversion" button at the bottom right corner to start transcoding GoPro Hero4 4K MP4 to DNxHD .mov. Finally, launch Davinci Resolve. Find the file in the Library panel, and then double click your clip or Right-click and select "Add into Media Pool." Now the clip is added to your Media Pool. You can also import entire directors or a range of clips into the Media Pool. So easy to edit GoPro Hero4 4K videos in Davinci Resolve 9/10/11/12, have a try.Have more questions about how to edit GoPro Hero4 4K MP4 in DaVinci Resolve, please feel free to contact us>> or leave a message at Facebook.More Topics:
Source: http://mp4gear.over-blog.com/2015/10/edit-gopro-hero4-4k-mp4-in-davinci-resolve
Step 3: Converting GoPro Hero4 4K MP4 video files to Davinci ResolveAfter all the necessary setting have been done, click the "Start conversion" button at the bottom right corner to start transcoding GoPro Hero4 4K MP4 to DNxHD .mov. Finally, launch Davinci Resolve. Find the file in the Library panel, and then double click your clip or Right-click and select "Add into Media Pool." Now the clip is added to your Media Pool. You can also import entire directors or a range of clips into the Media Pool. So easy to edit GoPro Hero4 4K videos in Davinci Resolve 9/10/11/12, have a try.Have more questions about how to edit GoPro Hero4 4K MP4 in DaVinci Resolve, please feel free to contact us>> or leave a message at Facebook.More Topics:
Source: http://mp4gear.over-blog.com/2015/10/edit-gopro-hero4-4k-mp4-in-davinci-resolve
“I have just got myself a new Toshiba Camileo X100 and it shoots in 1080i60 and the raw video files are in an .AVI format there are also backups stored as thm.AVI. When I try to import these files into Premiere on my Macbook Pro I get an error message saying "codec missing or unavailable.”
“When I try to import any video file (e.g. AVI files) in Adobe Premiere Pro cc in my Macbook Air, I get this error: “codec missing or unavailable”.
Maybe you have same trouble, no worry, keep reading. As we know, AVI is just a container for a video format, and can contain videos encoded in different formats. The error you're seeing says that Adobe Premiere does not know how to process the video format that's within the AVI file, that is to say, AVI codec is not recogonized by Premiere Pro.
Faced with this situation, you would have to find out the codec used for the video within the AVI file and then download and install the appropriate codec on your system. To find out the codec for the file, examine it using a tool like QuickTime or VLC and see if you can use the Inspectors in these to get the video and audio codecs for your file. If these two don't work, you would have to find a third program to transcode AVI to Premiere Pro supported format. According Premiere Pro supported formats, you clearly know Premiere Pro most supported MPEG-2 format.
So let powerful iFastime Video Converter Ultimate for Mac help you, which enables you to encode AVI to Premiere Pro compatible format without any quality loss. This top Video Converter Ultimate is a comprehensive video conversion application that allows you to convert a wide variety of formats to almost any output format, including
3D. The software easy to use, even the advanced features are not hard to figure out. There are only a handful of missing features that you probably won't even notice. What’s more, this universal video converter can handle almost any video file type, and it has an impressive list of editing tools. Read review to learn more about the easy-to-use video converter.
Hot search: Top 5 Free Mac Video Editors | AVI to FCP X | AVI to Samsung TV | H.265 to Adobe Premiere Pro
Download the program and you can edit AVI video in Adobe Premiere Pro smoothly as you wish.
Other Download:
Cnet Download: http://download.cnet.com/iFastime-Video-Converter-Ultimate/3000-2194_4-76448683.html
Winsite Download: http://www.winsite.com/Multimedia/Video/IFastime-Video-Converter-Ultimate-for-Mac/
Top 4 Download: http://www.top4download.com/ifastime-video-converter-ultimate-for-mac/hekvsosm.html
How to Transcode AVI fiel to Adobe Premiere Pro for editing?
Step 1. After downloading, install and run this top-quality converter, click "Add File " button to locate the AVI files you want to add.
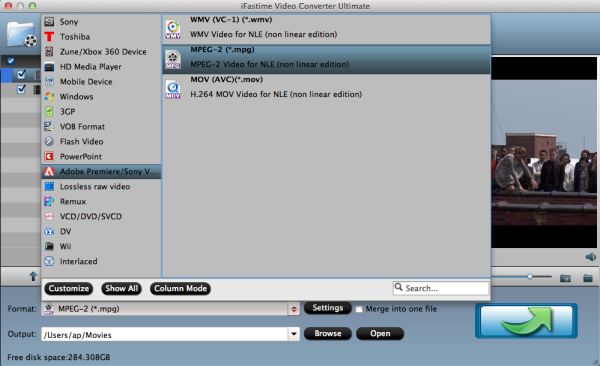
 Step 2. Click "Format" bar to choose the output format. Click and choose "Adobe Premiere/Sony Vegas" > "MEPG-2(*.mpg)". The setting seamlessly fits Premiere Pro CS4/CS5/CS3/CS6 and CC.
 Tips:
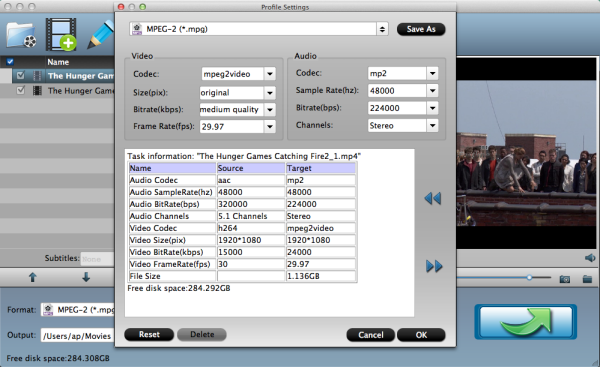
The Mac Samsung AVI converter for Premiere enables users to adjust audio and video settings before transcoding AVI to MPEG-2. Click "Settings" button, then you will enter the following interface, on which you are allowed to customize size, bit rate, frame rate, sample rate, and audio channel to your required ones.
Tips:
The Mac Samsung AVI converter for Premiere enables users to adjust audio and video settings before transcoding AVI to MPEG-2. Click "Settings" button, then you will enter the following interface, on which you are allowed to customize size, bit rate, frame rate, sample rate, and audio channel to your required ones.
 Step 3. Finally, hit the big convert button at the bottom right corner and the conversion from Samsung AVI to Adobe Premiere Pro will begin immediately on your Mac
After the conversion is finished, get the converted files via clicking the Open button and then you can import converted video files to Adobe Premiere Pro CS4/CS5/CS3/CS6/CC in Mac for further editing without any hassle.
So easy to import AVI video to Premiere Pro for editing, enjoy freely!
Have more questions about how to import AVI to Premiere Pro, please feel free to contact us>>
More Topics:
Source: http://avi-lover.jimdo.com/2015/09/08/import-avi-to-premiere-pro/
Step 3. Finally, hit the big convert button at the bottom right corner and the conversion from Samsung AVI to Adobe Premiere Pro will begin immediately on your Mac
After the conversion is finished, get the converted files via clicking the Open button and then you can import converted video files to Adobe Premiere Pro CS4/CS5/CS3/CS6/CC in Mac for further editing without any hassle.
So easy to import AVI video to Premiere Pro for editing, enjoy freely!
Have more questions about how to import AVI to Premiere Pro, please feel free to contact us>>
More Topics:
Source: http://avi-lover.jimdo.com/2015/09/08/import-avi-to-premiere-pro/
Samsung NX500 record true 4k video for 4X the resolution and details of Full HD. With HEVC (H.265) support, capture extreme details using half the storage space typically used for HD recording. It offers a lot of useful features, excellent video quality, and action-friendly performance that makes it a nice choice for families and travelers. If you have recorded some 4K H.265 videos from Samsung NX500, maybe you want to edit them in Adobe Premiere Pro for getting more wonderful videos, but you will found can’t import Samsung NX500 4K H.265 to Premiere Pro directly, often get some error messages. H.265(HEVC), a new format, is not easy for editing in Adobe Premiere Pro, even the latest Premiere Pro CC, so Samsung NX500 4K H.265 is not accepted by Adobe Premiere Pro. According to helpx.adobe.com, you clearly know Premiere Pro most supported MPEG-2 format. So in order to make you add Samsung NX500 4K H.265 videos to Adobe Premiere Pro without any problems, what you need to do is transcode your Samsung NX500 4K H.265 videos to more compatible with Premiere Pro as MPEG-2(which is the best format for Premiere Pro). iFastime Video Converter Ultimate for Mac is specially designed for those who failed to add Samsung NX500 4K H.265 videos to Adobe Premiere Pro. This powerful tool can easily convert Samsung NX500 4K H.265 videos to MPEG-2 codec with a few clicks. Besides 4K H.265, it also has the ability to convert DVD, Blu-ray, MP4, MTS, MXF, H.265, AVI, MKV, etc to Adobe Premiere Pro supported videos for more smooth editing. For Windows user, please get the Windows version.
Download the program and you can edit NX500 H.265 video in Adobe Premiere Pro smoothly as you wish. Other Download:
Cnet Download: http://download.cnet.com/iFastime-Video-Converter-Ultimate/3000-2194_4-76448683.html
Winsite Download: http://www.winsite.com/Multimedia/Video/IFastime-Video-Converter-Ultimate-for-Mac/
Top 4 Download: http://www.top4download.com/ifastime-video-converter-ultimate-for-mac/hekvsosm.html
How to transcode Samsung NX500 4K H.265 videos to Adobe Premiere Pro for editing?
Step 1. After downloading, install and run this top-quality converter, click "Add File " button to locate the H.265 files from Samsung NX500 you want to add.
Step 2. Click "Format" bar to choose the output format. Click and choose "Adobe Premiere/Sony Vegas" > "MEPG-2(*.mpg)". The setting seamlessly fits Premiere Pro CS4/CS5/CS3/CS6 and CC.
Tips:
The Mac Samsung NX500 4K H.265 converter for Premiere enables users to adjust audio and video settings before transcoding NX500 4K H.265 to MPEG-2. Click "Settings" button, then you will enter the following interface, on which you are allowed to customize size, bit rate, frame rate, sample rate, and audio channel to your required ones.
Step 3. Finally, hit the big convert button at the bottom right corner and the conversion from Samsung NX500 4K H.265 to Adobe Premiere Pro will begin immediately on your Mac
After the conversion is finished, get the converted files via clicking the Open button and then you can import converted video files to Adobe Premiere Pro in Mac for further editing without any hassle.
So easy to add Samsung NX500 4K H.265 video to Premiere Pro for editing, have a try!
Have more questions about how to import Samsung NX500 4K H.265 videos to Adobe Premiere Pro, please feel free tocontact us>> or leave a message at Facebook.
More Topics:
Source: http://digitalapplejuice.blogspot.com/2015/08/add-samsung-nx500-4k-h265-to-premiere-pro.html
Recently we found some people confused why can’t load 4K XAVC S MP4 video into GoPro Studio. Firstly i will explain why your video file might not be importing properly into GoPro Studio.
- Make sure that you are not trying to import the footage directly from an SD card. First copy the files to a folder on your computer.
- Make sure that you have the latest version of Quicktime installed.
- Next, make sure that there are no non-English characters in the name of the the file being imported, or the folder path where the file is saved.
- Do not rename the file(s) prior to importing into GoPro Studio.
- Make sure that you are trying to import the file into the correct "Room". GoPro Studio will not allow you to import the wrong file type into the wrong Room.
- All files, including MP4 files generated by GoPro cameras, should only be imported into the Step 1: Import Room.
- Files which have already been converted into GoPro Cineform AVI or MOV files, should only be imported into the Step 2: Edit Room.
- If you have confirmed that you are trying to import your files into the correct room, try playing the files with QuickTime Player or Windows Media Player to confirm that the files are not damaged.
- If your MP4 files still don’t import into the Step 1: IMPORT Room, make sure that they were not processed through some other application or import method, like iPhoto or iMovie. Files processed through iPhoto or iMovie are modified by those applications to the point where GoPro Studio doesn’t recognize them as GoPro camera footage. In this case copy the files directly from the SD card to your computer and then import into GoPro Studio.
- If your files are stored on an external drive, try copying your files to an internal drive and then import into Studio.
- Try creating a new project and then import.
In addition to above reasons, high 4K resolution is one main point. So in order to make you load 4K XAVC S MP4 video into GoPro Studio without any problems, you can seek help from iFastime Video Converter Ultimate which can compress and convert 4K XAVC S MP4 to GoPro Studio supported videos for your editing. Besides 4K XAVC S MP4 to GoPro Studio, this powerful video converter also can convert any videos like SD/HD/4K/DVD/Blu-ray to various NLEs like FCP, iMovie, Premiere Pro, and more.Free download the top video converter for Windows:
 Other Download:
How to Convert 4K XAVC S MP4 video into GoPro Studio with the best 4K to GoPro Studio Converter?Step 1. Add 4K XAVC S MP4 videoInstall and run the Video to GoPro Studio Converter on your computer, then click "Add Video" button to browse and load your rvideos which you've transferred to your Windows PC.
Other Download:
How to Convert 4K XAVC S MP4 video into GoPro Studio with the best 4K to GoPro Studio Converter?Step 1. Add 4K XAVC S MP4 videoInstall and run the Video to GoPro Studio Converter on your computer, then click "Add Video" button to browse and load your rvideos which you've transferred to your Windows PC.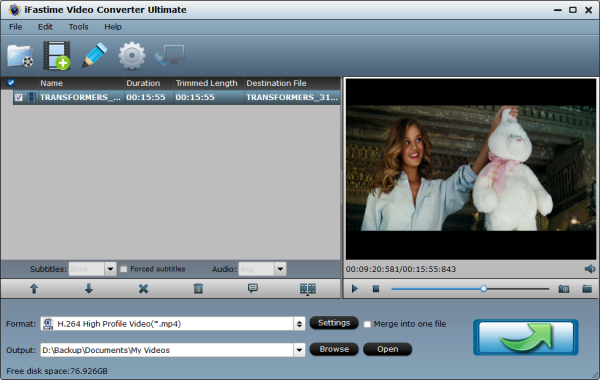 Step 2. Select GoPro Studio friendly formatClick Format bar and choose your desired format. To add videos to GoPro Studio, you can choose to .mp4, .mov, etc compressed format from "Common Video" or "HD video" as the target format.
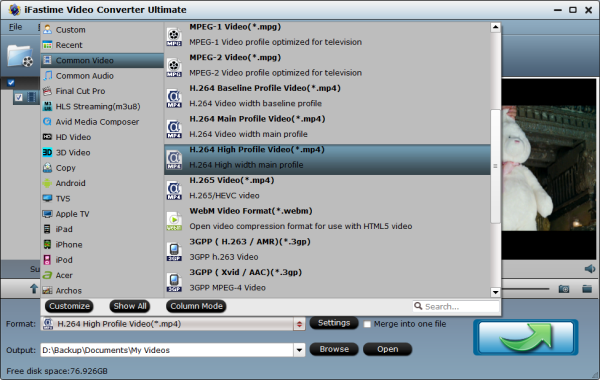 Tip: You can click the "Settings" button and customize proper video/audio parameters including Video size, bitrate and fame rate and mroe. Usually 1920*1080 video size and 30fps video frame rate are recommended for GoPro Studio editing.
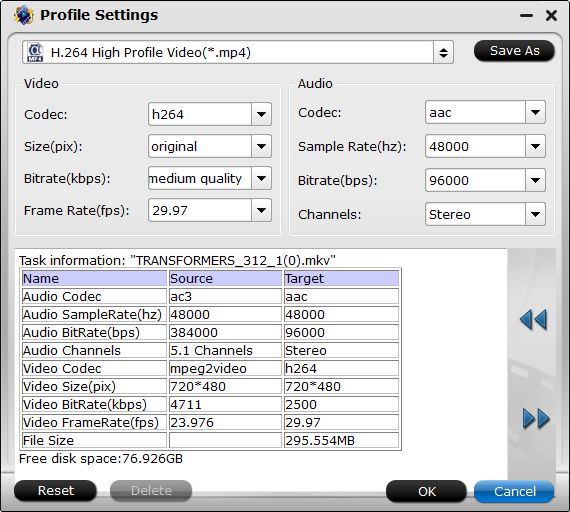 Step 3. Start converting video to GoPro StudioAfter all necessary settings, hit the "Start conversion" button to start the 4K XAVC S MP4 video to GoPro Studio conversion. Once the conversion process shows in 100%, click "Open" to get the output videos. Create a project and start editing your Videos in GoPro Studio with light speed. Nothing could be simpler or more immediate.Have more questions about how to load 4K XAVC S MP4 video into GoPro Studio, please feel free to contact us>> or leave a message at Facebook.More Topics:
Source: http://4kcentral.tumblr.com/post/136172520266/load-4k-xavcs-mp4-into-gopro-studio
Step 3. Start converting video to GoPro StudioAfter all necessary settings, hit the "Start conversion" button to start the 4K XAVC S MP4 video to GoPro Studio conversion. Once the conversion process shows in 100%, click "Open" to get the output videos. Create a project and start editing your Videos in GoPro Studio with light speed. Nothing could be simpler or more immediate.Have more questions about how to load 4K XAVC S MP4 video into GoPro Studio, please feel free to contact us>> or leave a message at Facebook.More Topics:
Source: http://4kcentral.tumblr.com/post/136172520266/load-4k-xavcs-mp4-into-gopro-studio
It's wonderful to take 4K, 1080p videos with iPhone(iPhone 6S, iPhone 6, iPhon 6 Plus) and want to edit these interesting iPhone video with Windows Movie Maker, then share the iPhone video with friends or upload to YouTube or Facebook. Unfortunately, you always fail when you import iPhone video to Windows Movie Maker.
As we know, iPhone (including iPhone 6S, iPhone 6, iPhone 6 Plus, iPhone 5S, iPhone 5C, iPhone 4S, etc.) records in .MOV files compressed using the h.264 codec, which isn't a codec that plays well together with Windows Movie Maker.
To import an iPhone Video into Windows Movie Maker, what you need is just a professional video converter like iFastime Video Converter Ultimate, which can help you transcode iPhone video to WMV so that you can import iPhone video to Windows Movie Maker for editing. Beside iPhone video, it can also convert many video formats like M2TS, AVI, VOB, Xvid, etc. to Windows Movie Maker, and compress 4K video captured by iPhone 6S/6/6 Plus to 1080p or 720p to save more storage. What's more, it can help you convert iPhone video to Sony Vegas, Adobe Premiere Pro, Avid Media Composer and more. Read review to learn more. Just download it and follow the steps below.
Free Download or Purchase iFastime Video Converter Ultimate:
Other Download:
How to import iPhone Videos to Windows Movie Maker
Step 1. Load iPhone recorded files to the program
After install and run the Video Converter, click "Add Video" button to load the iPhone files. And you also can drag the files to this program directly.
 Step 2. Choose output format
Choose the output format as WMV. To do this, click the "Format" on the bottom of the Software window and choose WMV from "Common Video" category. To get high output video quality, you're recommended to choose "WMV HD(*.wmv)" from "HD Video" category.
Step 2. Choose output format
Choose the output format as WMV. To do this, click the "Format" on the bottom of the Software window and choose WMV from "Common Video" category. To get high output video quality, you're recommended to choose "WMV HD(*.wmv)" from "HD Video" category.
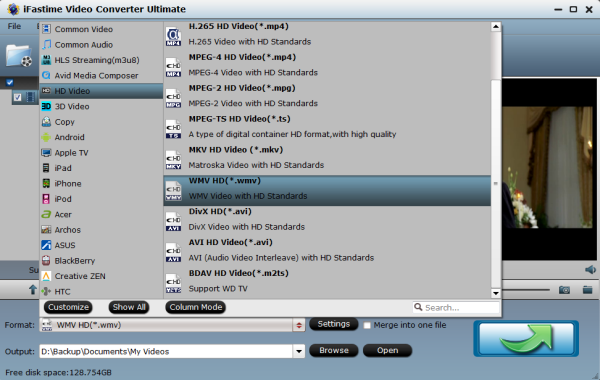 Tip: If you want to make changes to the video settings like resolution, bit rate and other settings, click the "Settings" button at bottom.
 Step 3. Convert iPhone video to Windows Movie Maker compatible WMV format
When everything is ready, simply click the Convert button and all the imported iPhone video files will be converted to WMV format by this MOV to Windows Movie Maker Video Converter.
Step 4. Import iPhone Videos to Windows Movie Maker
When the conversion complete, open Windows Movie Maker and click Import or Import Video on the left to import your video to the movie collection and drag and drop to the timeline for editing. Then you can share the better iPhone videos to your friends or upload these edited iPhone video to YouTube. Have a good time.
Have more questions about how to import an iPhone Video into Windows Movie Maker, please feel free to contact us>> or leave a message at Facebook.
More Topics:
Step 3. Convert iPhone video to Windows Movie Maker compatible WMV format
When everything is ready, simply click the Convert button and all the imported iPhone video files will be converted to WMV format by this MOV to Windows Movie Maker Video Converter.
Step 4. Import iPhone Videos to Windows Movie Maker
When the conversion complete, open Windows Movie Maker and click Import or Import Video on the left to import your video to the movie collection and drag and drop to the timeline for editing. Then you can share the better iPhone videos to your friends or upload these edited iPhone video to YouTube. Have a good time.
Have more questions about how to import an iPhone Video into Windows Movie Maker, please feel free to contact us>> or leave a message at Facebook.
More Topics:
Collected some info from GoPro forum, there are more than one threads mentioned the GoPro Studio issues while editing or converting GoPro footage since it’s released: won’t import videos, crashes, can’t output files... In fact, GoPro Studio is a free software makes it easier than ever to create professional-quality videos with your GoPro content. While, it’s still not a solid software for us to handle GoPro video clips. In this case, what you need is a GoPro Studio alternative that works on Windows or Mac.I found iFastime Video Converter Ultimate is just suitable to your needs, which is an all-in-one video converter and editor. This video app is an all-in-one editor and even video player. With its built-in editing feature, it allows you to trim clips, crop videos, add effects, insert subtitles, etc as GoPro Studio does. What's more, this video app is also professionalized in converting videos in all formats, including GoPro (4K) MP4, MTS, MXF, AVI, MKV, FLV, MPG format and make them best compatible with YouTube, Vimeo, Final Cut Pro, Galaxy Tab and more video sharing websites, professional editing programs and portable media devices. And and downsize 4K videos to 1080p with high quality kept and more. Overall, you can effortlessly find this program can be seen as the best GoPro Studio alternative and is even much better than it.If you are running on Mac, iFastime Video Converter Ultimate for Mac is right for you.How to use GoPro Studio Alternative to convert/edit videosStep 1. Import video filesLaunch the video converter first. To import the local videos you want, you can click the "Add video" button. A pop-up window will lead you to locate your local files. Or you can directly drag the videos you want to this program. Batch conversion is supported.Step 2. Select output format you want Click the "Format" icon, and then find the video format you want. As you can see, various video formats like MOV, MKV, FLV, WMV, AVI, etc. are provided. You can also choose the icon of iPhone, iPad, iPod, Final Cut Pro, Samsung, Android, etc. to get videos with best settings for the selected device/software.Tip: If you want to customize the output video quality, you can click the "Settings" button to open the Settings window and set video resolution, frame rate, bit rate, codec, etc.Step 3. Edit videos files you ownFar more than a video conversion program, it provides some video editing functions: trim video into smaller segments; remove unwanted objects from video; brand your video by embedding a watermark; importing subtitle files in .srt or .sst format to video files.
- Trim: You can use the “Trim” function to remove the unwanted segments by deciding where to start and where to end when converting the selected clip.
- Crop: With the “Crop” function, you can remove the black edges around the image.
- Text Watermark: Check “Enable”, you can add your desired text watermark to the selected video, you can also drag the text watermark on the preview screen to adjust its position, or set text font, color, size and style.
- Image/Video Watermark: Tick off “Enable”, you can apply image or video watermark to the selected video. The location for the image/video watermark can also be set by dragging on the preview screen.
- Effect: From effect drop-down option, you can select special effects like: Simple Gauss Blur, Flip Color, Invert, Aged Film to apply to your source video. In Color Control section, you can change color by adjusting brightness, contrast, saturation. You can also check “Deinterlacing” to keep good image quality.
- Audio Editor: You can remove the original audio from video or replace the original video with another audio, you can also set audio fade in or fade out effects.
- Subtitle: Check “Enable”, you can add *.srt or *.ass/*.ssa subtitle files to the video as hard subtitles.
Step 4. Start conversion After all the settings are OK, click the "Start conversion" button to start converting videos with ultra fast speed. After the conversion, just click Open button to locate the output files. You can now use your converted video files anywhere you want them. Wish the best alternative to GoPro Studio help you truly.Additional Tips:If you got some GoPro MP4 videos and you want to edit with a more professional option, Adobe Premiere Pro, Final Cut Pro are all the good choices. While, as we know these NLEs are not able to ingest GoPro videos in H.264 codec. In this case, the recommended GoPro Studio Alternative can be used to transcode GoPro videos to Adobe PP/FCP/iMovie compatible format. Have more questions about best alternative to GoPro Studio, please feel free to contact us>> or leave a message at Facebook.More Topics:
A growing number of professional digital camcorders tend to record videos in the MXF format, such as Sony XDCAM, Panasonic HVX200/HPX300/HPX500 P2 HD, Canon XF100/XF300/XF305/C300/C500 and much more. Users who want to edit MXF footage with Sony Movie Studio usually run into incompatibility issue. In fact, MXF is not the supported list of Sony Movie Studio, like Sony Vegas. It's not supported natively. But what to do if you just have a Sony Movie Studio installed and wanna use MXF files to create you own masterpieces? The easiest way to solve MXF issues in Sony Movie Studio is to convert MXF video to Movie Studio editable format, such as MPEG-4. Here iFastime Video Converter Ultimate is suggested, it can convert MXF to a more editing-friendly format, such as MPEG-2 for the Movie Studio. (read review)This program is fully compatible with MXF format and can convert MXF file to any popular format you want, including but not limited to MP4, MPEG, H.264, VOB, AVI, MOV, FLV, MKV, MOD, WMV, ASF, 3GP, etc. If your MXF files are large, it can also compress and convert MXF to a smaller size so you can easily edit with Sony Movie Studio. By the way, if you use Mac computer, please go to get the Mac version here.Free Download or Purchase iFastime Video Converter Ultimate: Other Download:
How to Convert MXF files to MPEG-2 for Sony Movie StudioStep 1. Add MXF files to MXF to Sony Movie StudioRun this MXF Converter after installation. Then drag and drop MXF files from Finder to the application. Step 2. Choose an output formatNext, go to the Format tray at bottom and select an output format. The formats are grouped into several categories like Video, Device, Editing. Find the output format you want. All the imported MXF will be converted to the selected format. By clicking the "Settings" button you can make changes to the default video settings like Resolution, Frame Rate, Bit Rate, etc.
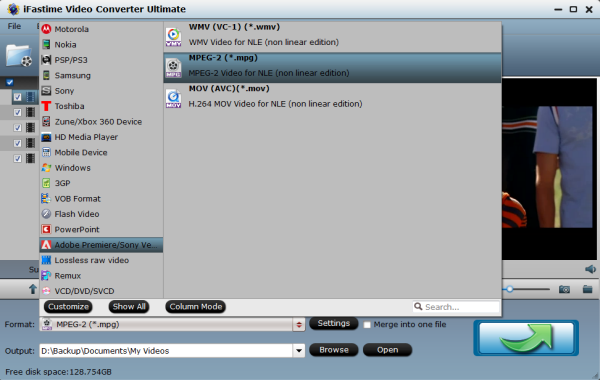 If you want to combine all MXF video files into one file, check the "Merge" option at bottom.Step 3. Start to convert MXF to MPEG-2 for Sony Movie StudioLastly, click the "Start conversion" button and all the conversion tasks will be finished automatically by this MXF Video Converter. The output path will open when all MXF files are converted to your desired format. You can import the converted MXF files with Sony Movie Studio for editing. Or transfer to your device to play without any hassle.iFastime Video Converter Ultimate not only supports MXF format, but also over 100 video/audio formats. It helps you convert MXF and other formats of files at ultrafast speed and keeping the original video quality. Besides, this powerful video converter also can convert other videos including MP4, AVI, MOV, MTS, etc to Vegas Pro, Pinnacle Studio,Windows Movie Maker, Avid Media Composer, Adobe Premiere Pro and more NLE supported format on Windows. Importing media into Sony Movie Studio:Importing media allows you to add media to the Project Media list for use in your project without adding it to the timeline.1. From the Project menu, choose Import Media. The Import Media dialog is displayed.2. Navigate to and select a media file to add the Project Media list. You can use Ctrl or Shift to select multiple files.3. Click Open. The media file is added to the Project Media list.Have more questions about how to work with MXF footage in Sony Movie Studio, please feel free to contact us>> or leave a message at Facebook.More Topics: